New Language Support & Translations
I. Introduction
So far, you have created your ToDoApplication and implemented all of your business entities along with the business requirements.
Your ToDoApplication is now ready to be generated and deployed.
However, seeing as your default application language is English, none english speakers will not understand your application.
And since we are also targetting French speakers, we will need to add French support to our appication.(you coud pick whatever one from the 11 supported languages instead of French)
But how can you do it knowing that your application only supports English ?
Should you consider re-writing the whole application display in your target language ? Or shouldn’t you ?
What if you want your application to support more than two languages ?
Should you re-write an application instance for each language ?
Well, believe it or not, your ToDoApplication already supports multi-language!
Better! Learning new languages is a matter of configurations.
Now, your application is ready, what if you take it to the next level and let it speak multiple languages so that you can target a wider audience ?
Sounds brilliant ? Then let’s GO!
🙋♂️ For the sake of this tutorial, we are going to add French support to our ToDoApplication, but you might procede with any language from the list of supported ones.
Let’s go ahead and learn French!
🔖 Note that
averos frameworkcurrently supports 11 languages (discribed below) out of the box; so feel free to carry on with whatever additional language from that list instead of French.
II. Add a New Language Support
The current averos framework version supports these 11 languages out of the box.
| Supported Language | Language Code |
|---|---|
| Arabic [ 🇹🇳 ] | ar |
| Chinese [ 🇨🇳 ] | cn |
| English [ 🇺🇸 ] | en |
| Spanish [ 🇪🇸 ] | es |
| French [ 🇫🇷 ] | fr |
| German [ 🇩🇪 ] | de |
| Japanese [ 🇯🇵 ] | jp |
| Dutch [ 🇳🇱 ] | nl |
| Norwegian [ 🇳🇴 ] | no |
| Russian [ 🇷🇺 ] | ru |
| Swedish [ 🇸🇪 ] | se |
This means that the default user interfaces, including labels, actions, validation messages, actions messages and domain values, are already translated for you in these languages.
Any additional translations should be added to an Averos Language configuration, but we will come to translations later on.
Shall we start adding French support to our ToDoApplication ?
Ok!
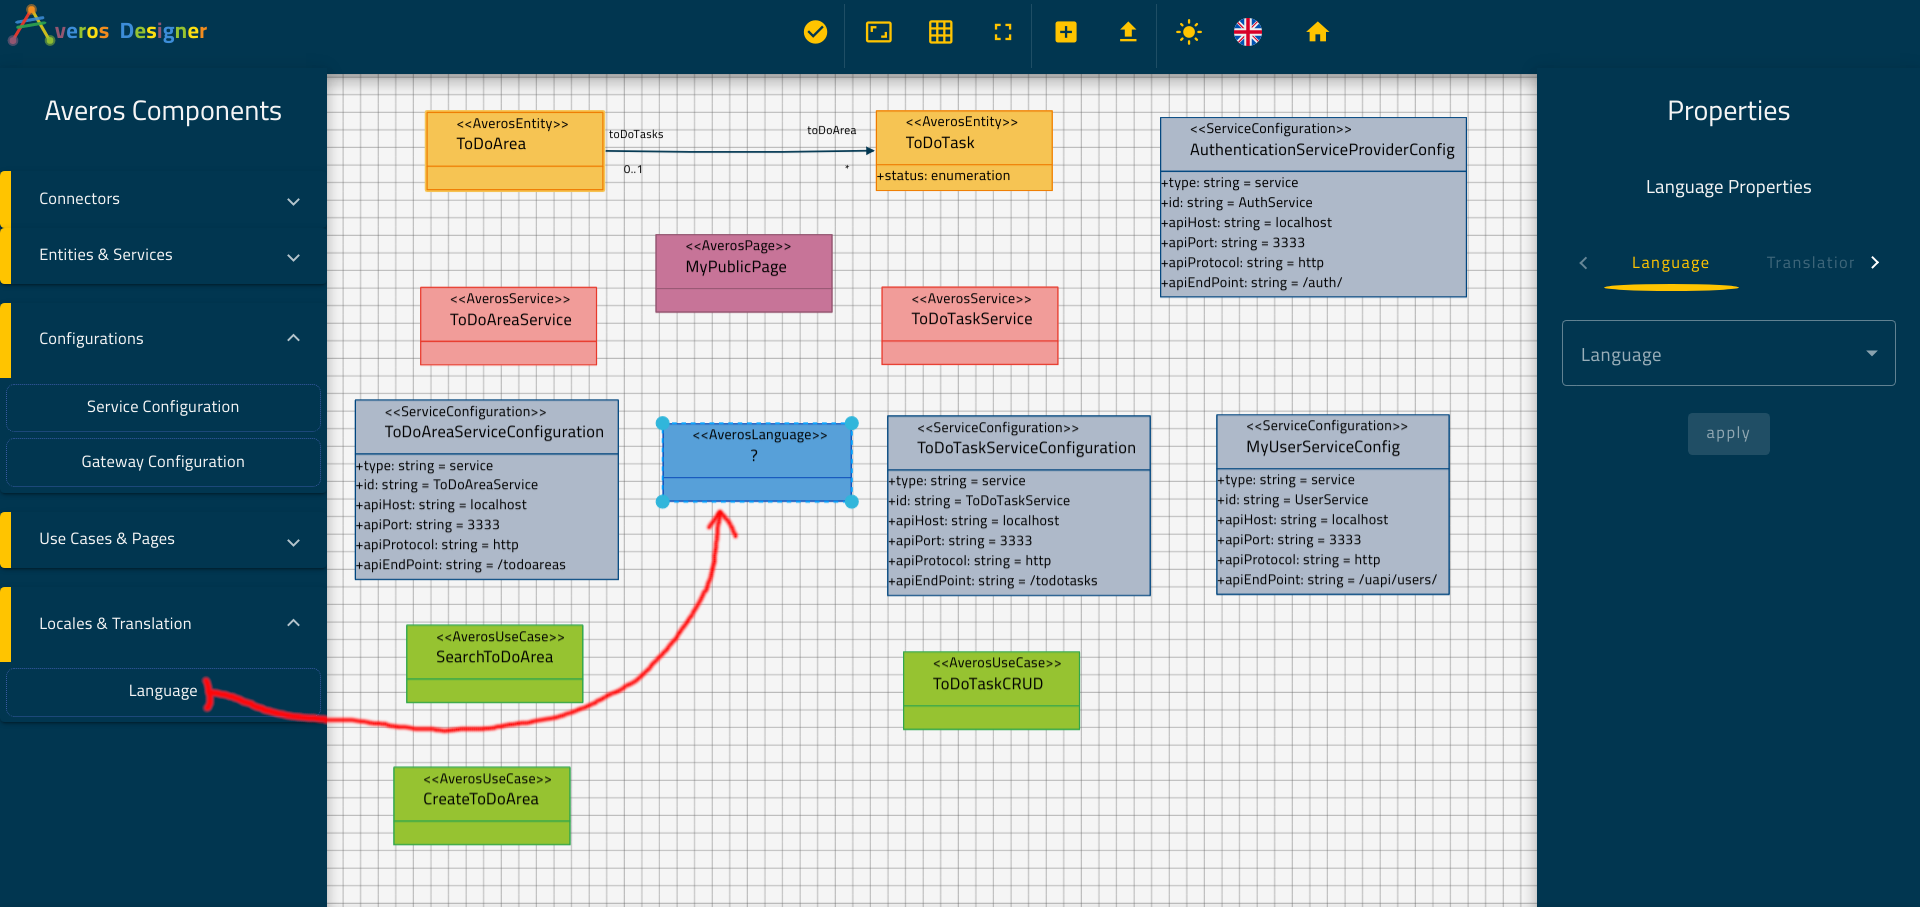
Go back to Averos Designer and expand the Locales & Translation components set located in the Averos Components panel.
Drag and drop one Language component into the canvas as shown in the picture below:
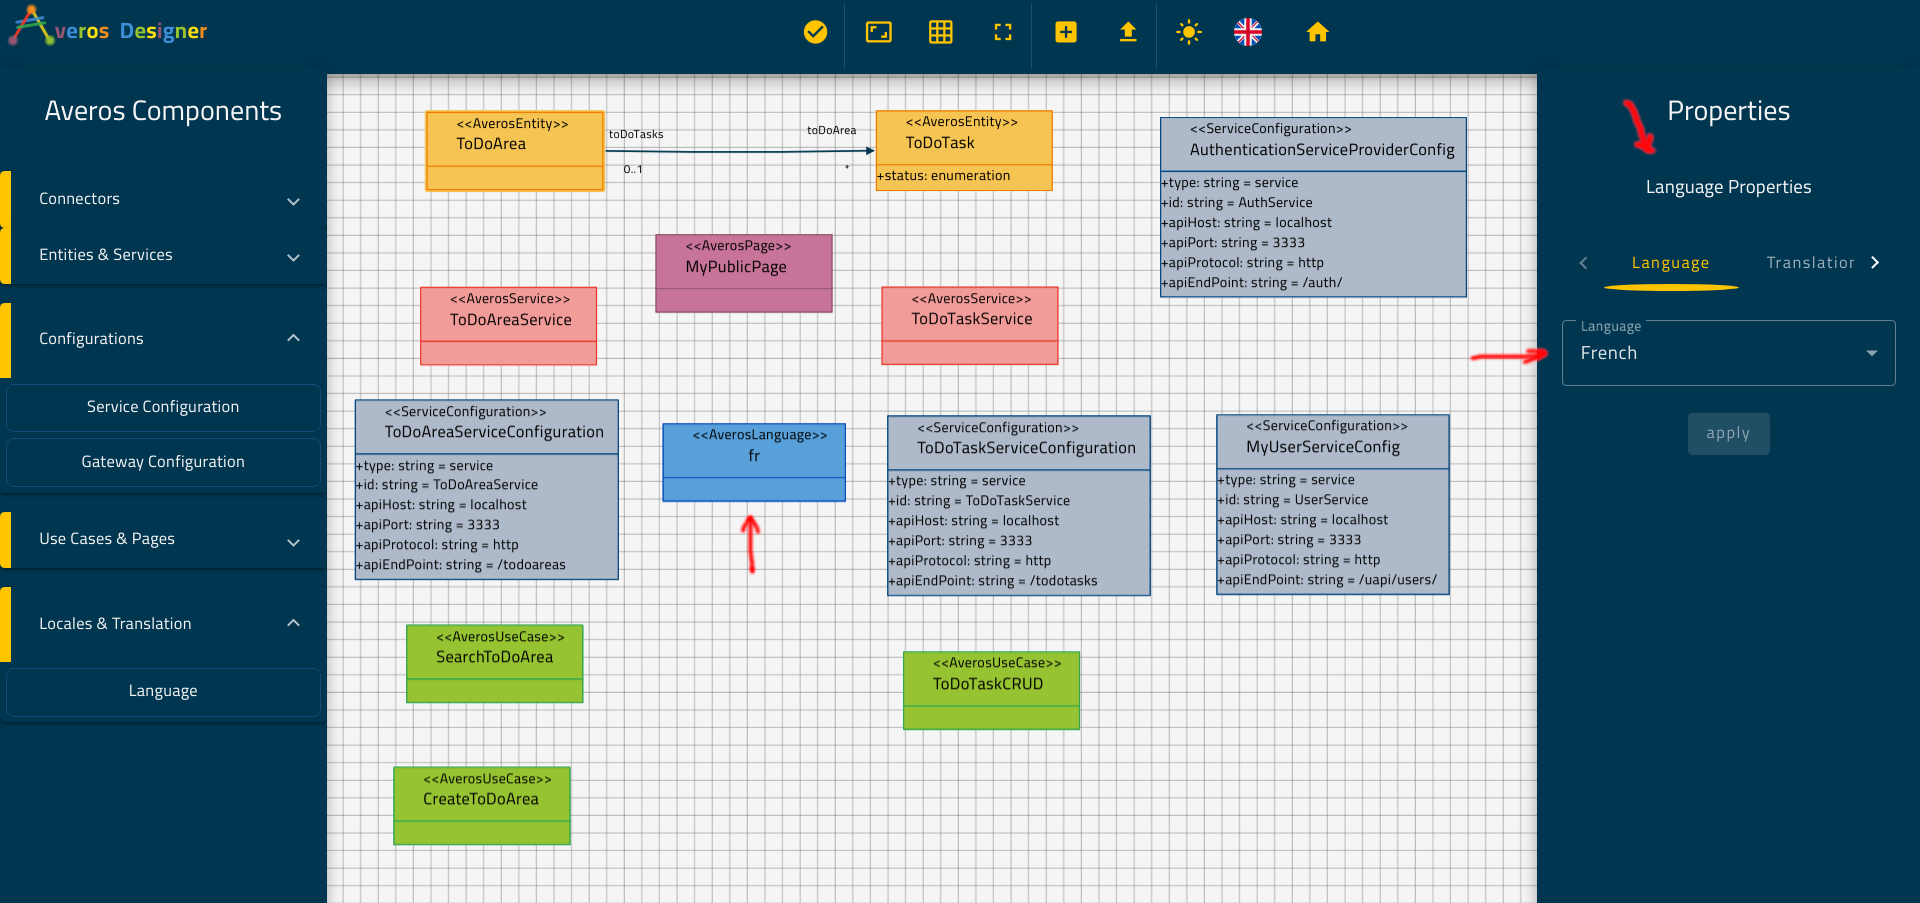
Select your language component then go to Language Properties and choose French (or your chosen language) from the list of languages.
Click apply.
Your language component should look like the one in the following picture:
🎉 Congratulations! Your application now speaks french at a beginner level.<br/
This means that all generated default user interfaces-including default labels, default actions, default validation messages, default process messages and default domain values- are already translated in French for you (or in the language you’ve chosen to procede with).
At this point, with this configuration the following items will be translated for you
- action button labels
- default layout labels
- default application messages (success messages, error messages…)
- entities’ displayed values
- default sign in and register Component
Still, our entity attributes names, our menu labels and our use cases labels/titles have not been translated yet! (they were introduced by you, remember ?
Let’s improve our application vocabulary and teach it new French words!
III. Teach your application New Words
With Averos Framework, your application can be tought new words related to its echosystem.
From components and use cases labels/titles, to entities and members labels throughout action labels; every thing can be tought to your application in a new language.
OK! Let’s do this!
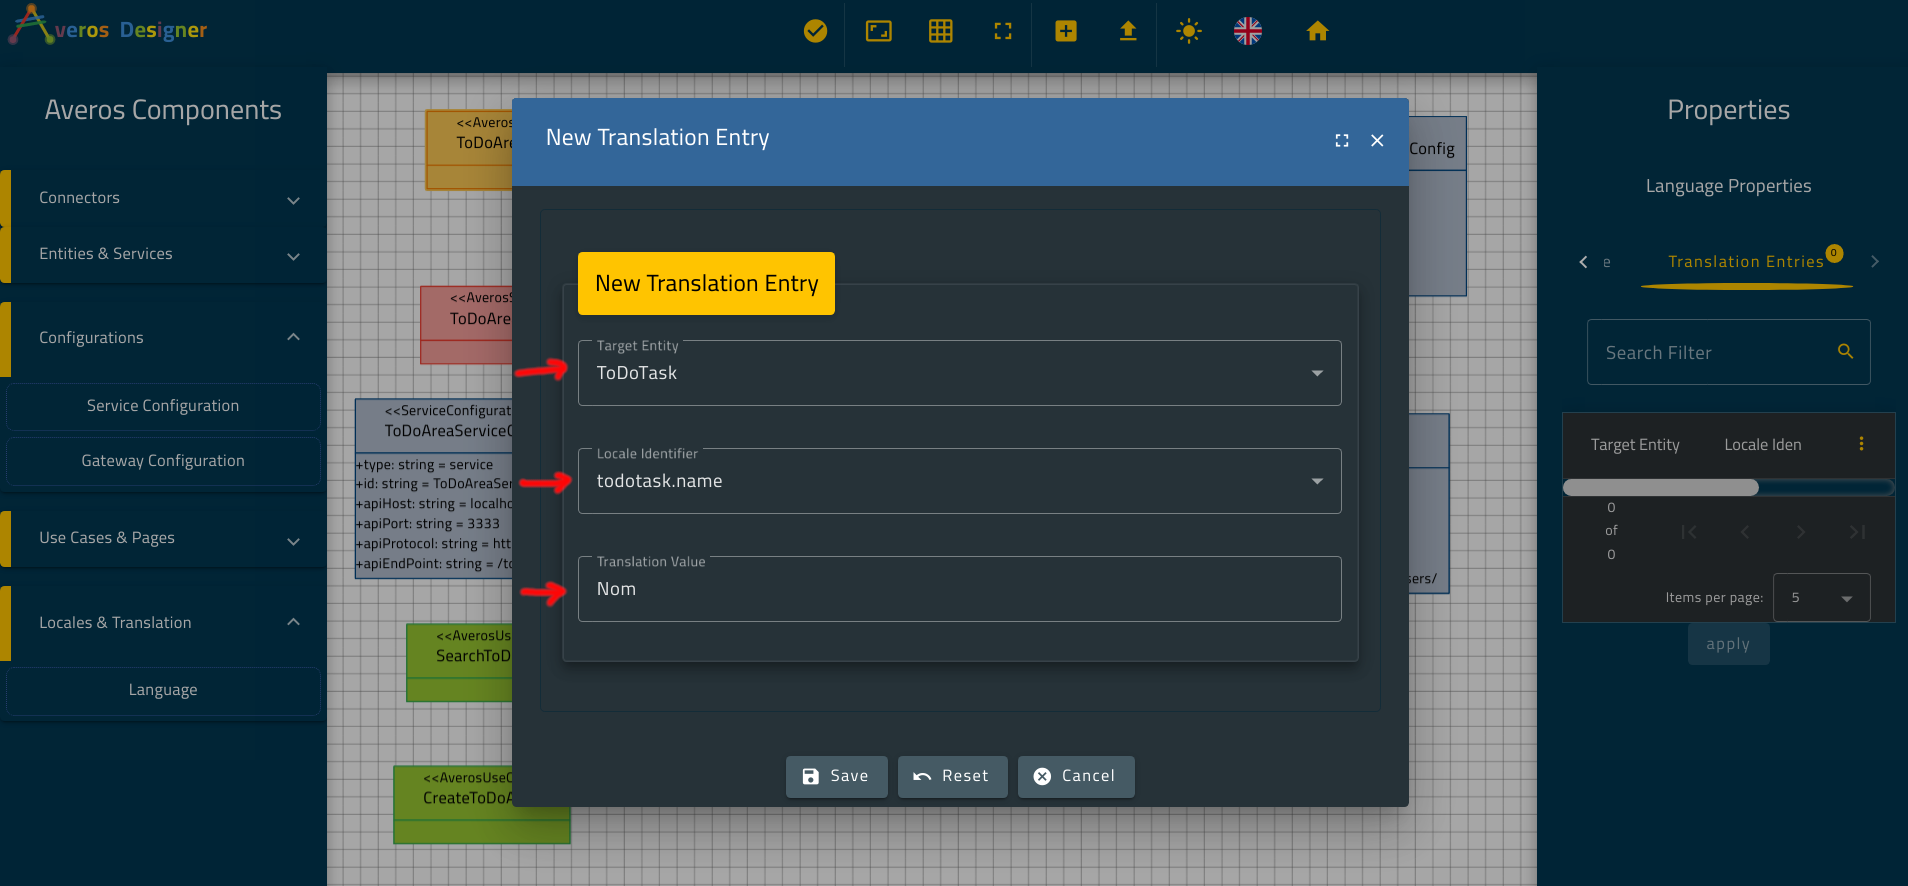
In order to teach your application new words in a specific language, you need to create a translation entry to the language configuration that you have just created.
Go ahead and select your Language component.
From the Language Properties panel go to the tab Translation Entries and click on add.
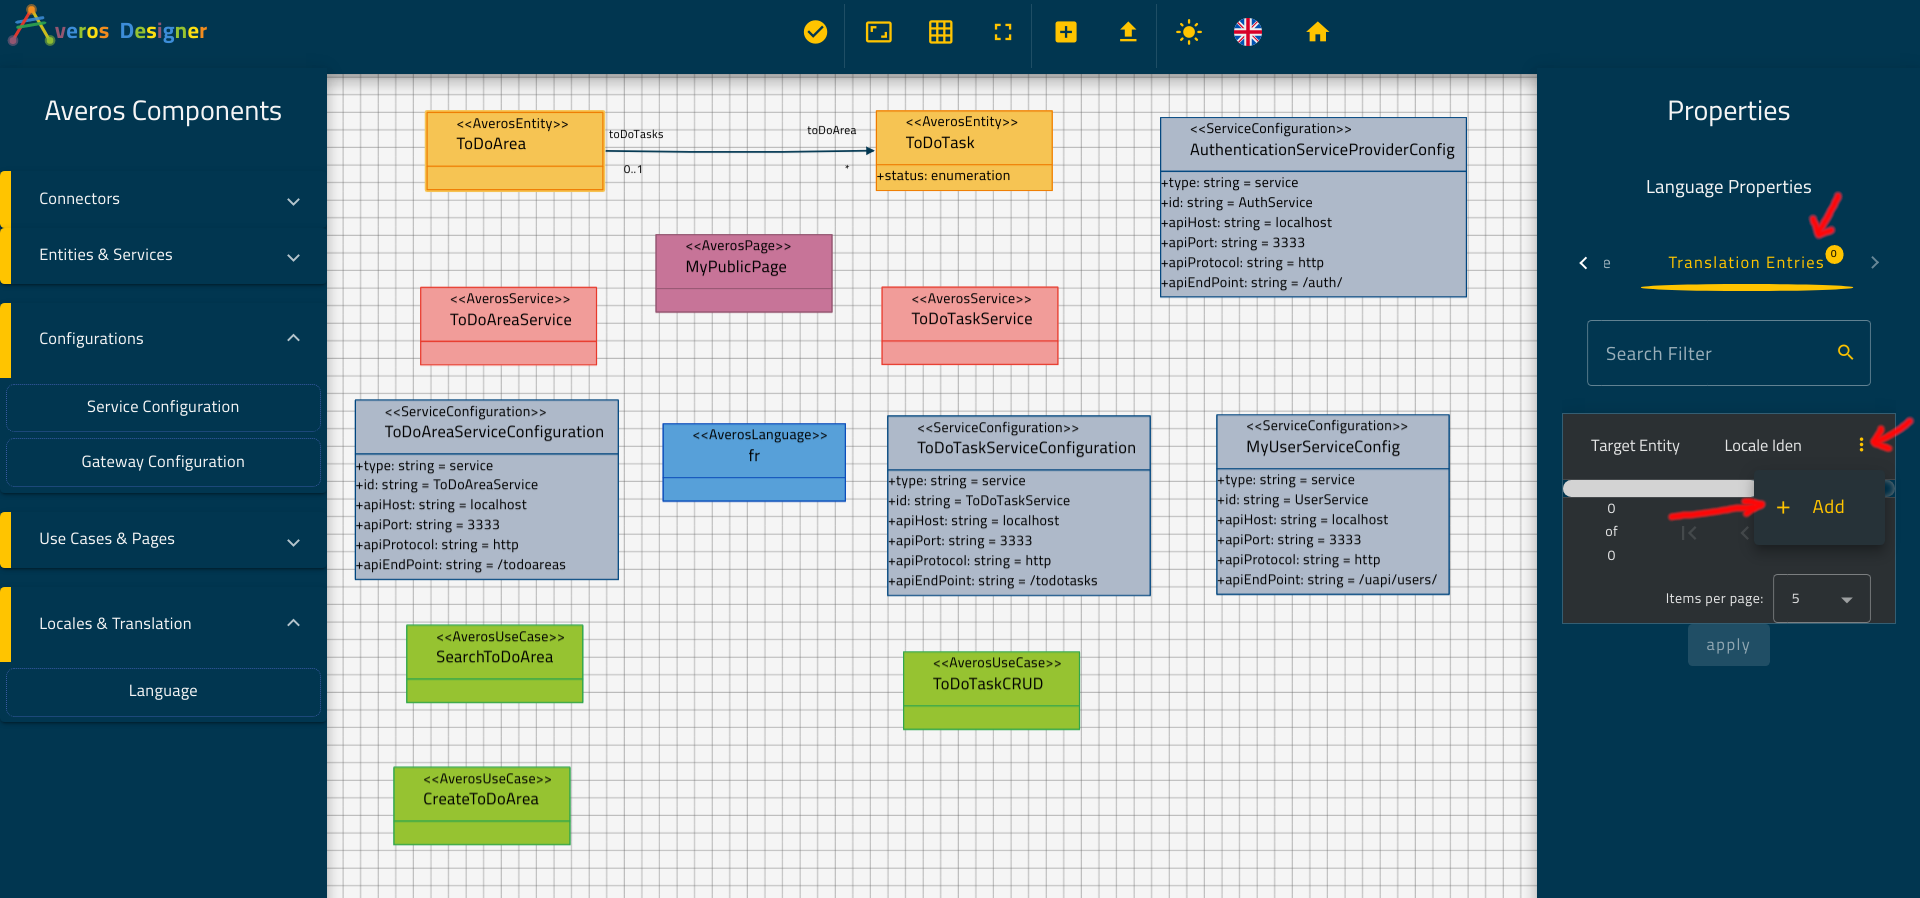
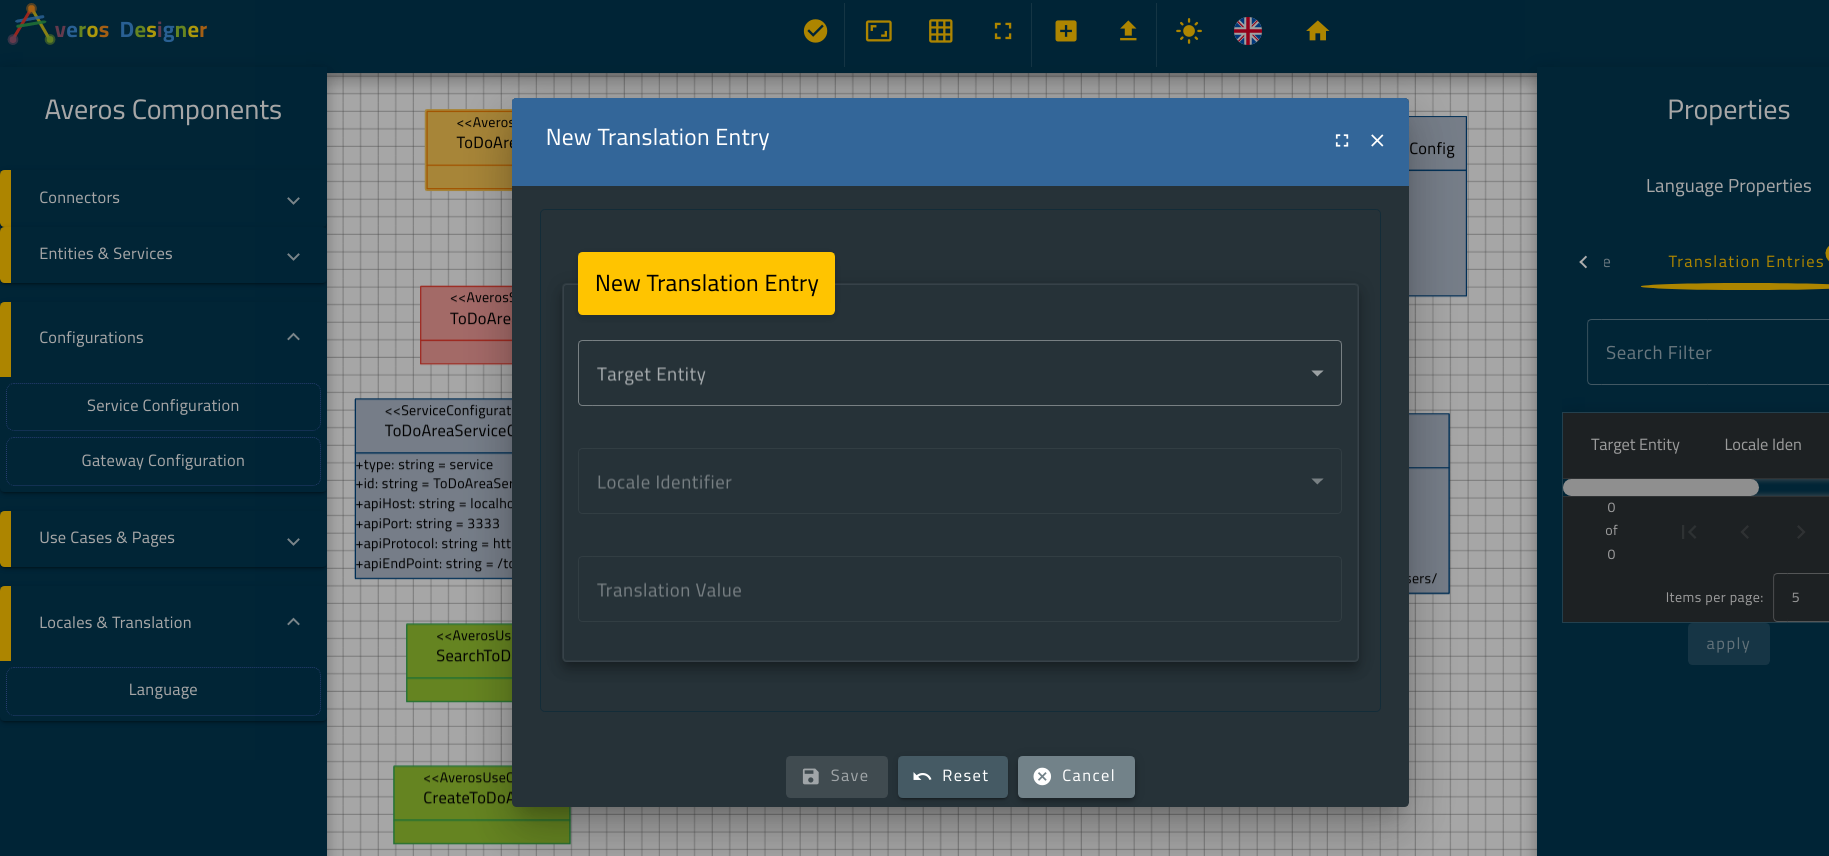
Notice that a Translation entry is composed a Target Entity, a locale identifier and a Translation Value.
Go ahead and open Target Entity.
You will notice that a Target Entity to be translated could be either an Averos Entity or an Averos Use Case.
Let’s try to translate ToDoArea.
From the New Translation Entry page select open Target Entity and select ToDoArea.
Now, open Locale Identifier.
Averos Designer dynamically brings all possible translations related to the Target Entity that you have selected.
Notice that all the member names along with the enumeration values are subject to translation.
Knowing that name in French is Nom, go ahead and translate the name for example, .
🔖 since
nameis a member part ofToDoArea, theLocale Identifierofnamewould betodoarea.name.
You translation entry should look like this one:
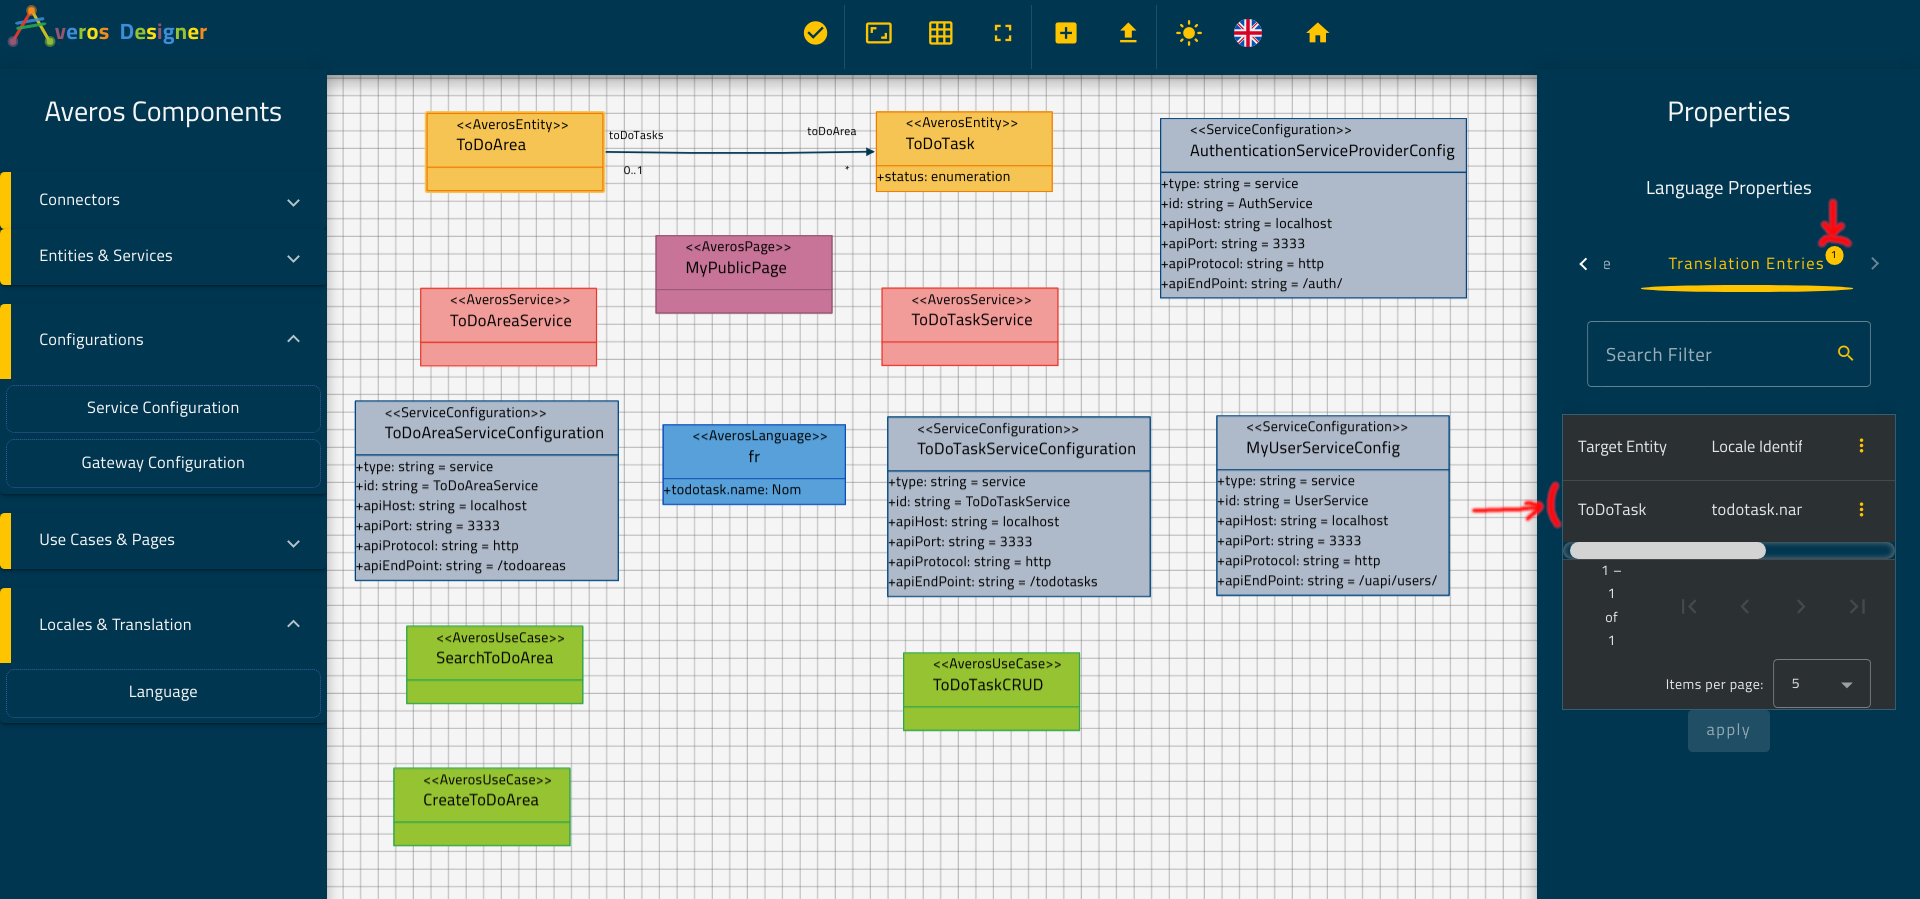
Now carry on with all the available Translation Keys.
One you finish all the translations in the language of your choice, you should have something like the following:
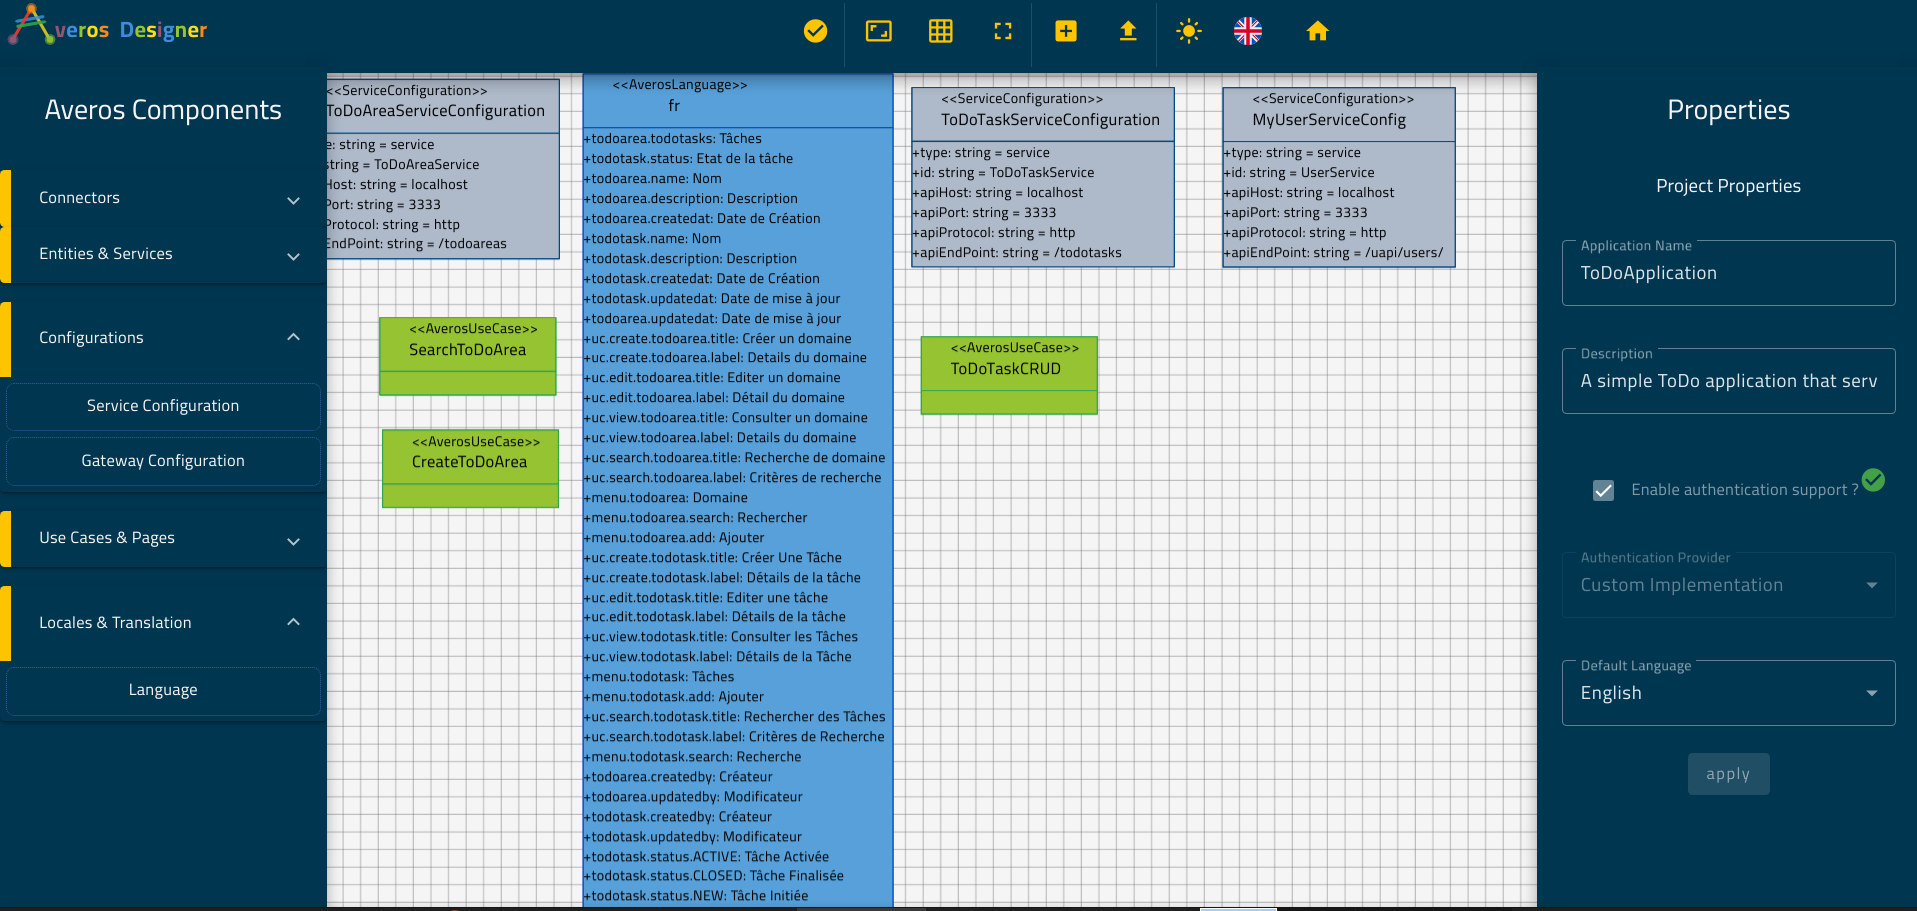
🙋♂️ Don’t worry, in the next section, I will leave a link to download the full averos design project so that you will be able to import it to Averos Designer and generate a ToDoApplication.
Congratulations! Your application now speaks French fluently!
Your final diagramm should look like the following:
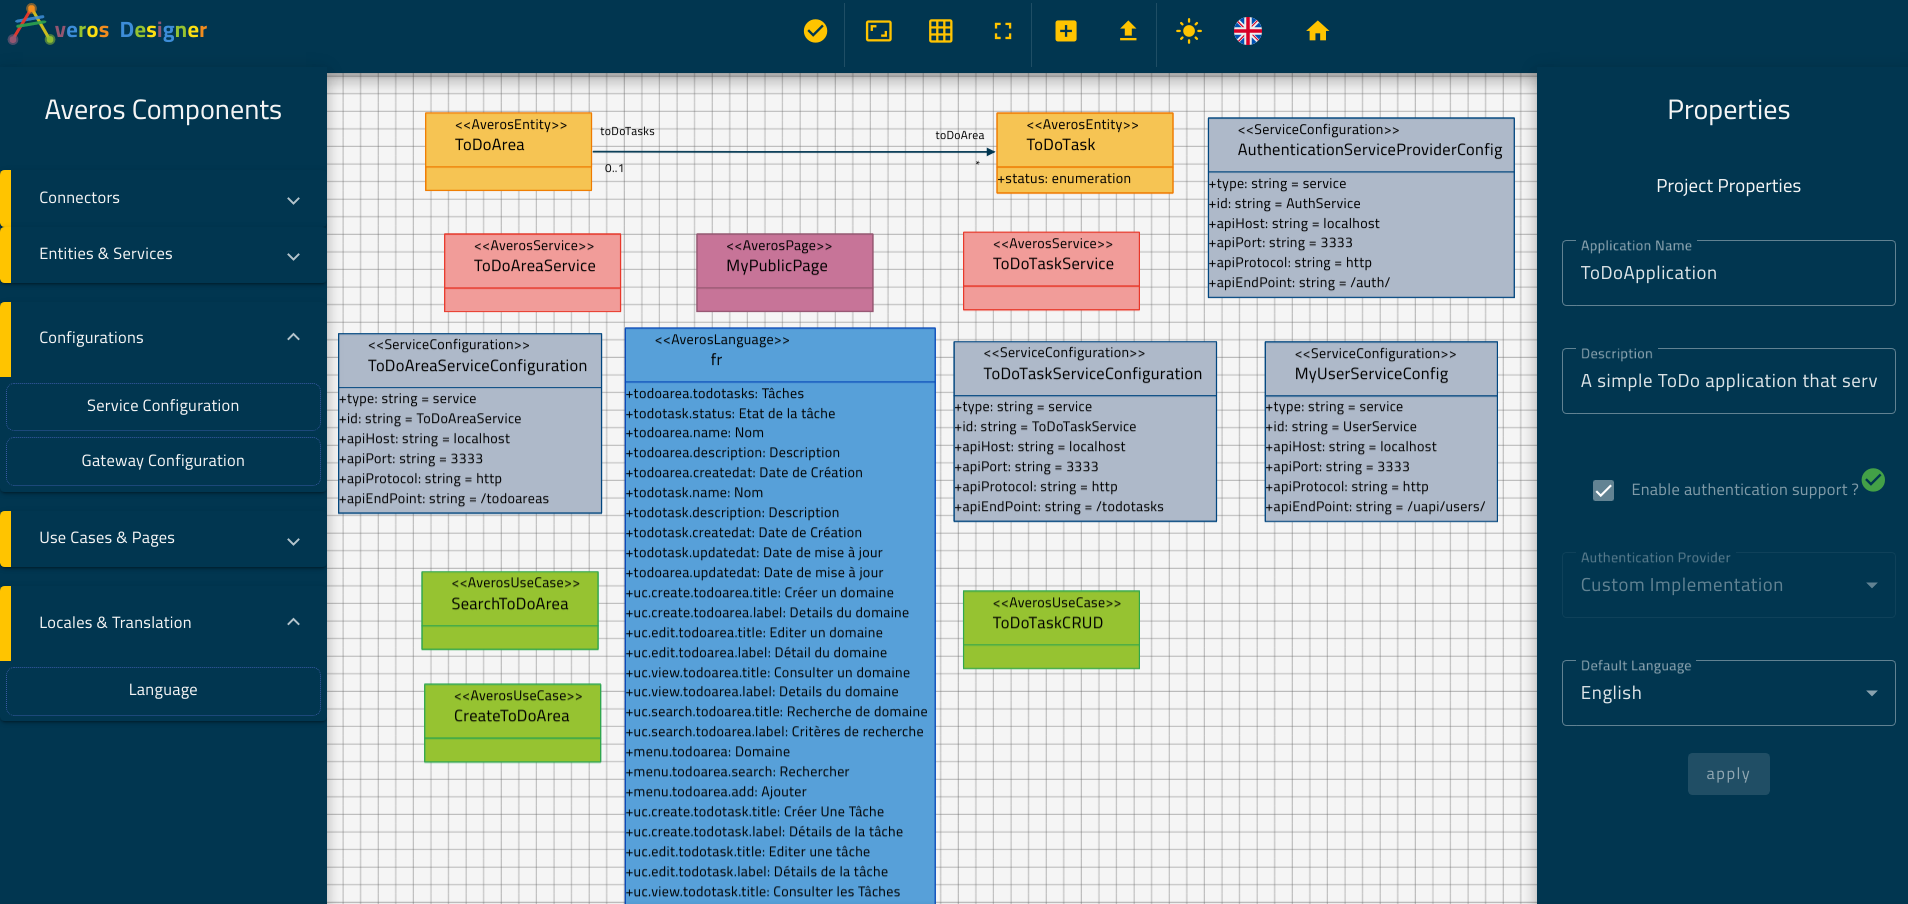
You have done a nice work so far! Your new application is humain friendly, supports multilanguage and cares about user experience.
You will find that, switching the application language to English, will modify the whole application language context and display almost instantly.
Averos Framework supports up to 11 languages out of the box, so you might want to experience with the framework by adding more languages and exposing your application to even wider audience.
🎉🎉🎉 Congratulations and thank you for reaching this far in this tutorial! 🎉🎉🎉
Your ToDoApplication is now fully functional and ready to be generated!
So far, in this step-by-step tutorial you have first designed your ToDoApplication and defined your business requirement.
Then, you have used averos designer to create your application entities and to implement your business requirement.
Finally, you have added a new language to your application, using Averos Designer, making it available for a wider audience.
In the next sections, you are going to generate, download and run your ToDoApplication.
Finally we are going to explore our application then I will let you do it yourself.
See you in the next section!