Customize your application - Generate Use Cases
I. Introduction
You have so far defined the application business requirement as well as the target application design then generated a first version of your ToDoApplication with authentication and user management capabilities.
Then, you have used averos workflow commands to generate your business entities along with their members and their relationships.
You have also generated the entity managing services and bound them to their APIs backend services using averos configuration workflow command.
Finally, you have re-built and redeployed a new version of your application then singned into it.
Much to your surprise, your new application version is just the same as the first version.
Or is it not ?
Well, your new application is not exactly the same as your first version, since now you have additional implementations and configurations that occured under the hood.
However, the user interface is still the same since no use case has been introduced into the application yet.
Remember those business requirements you defined in the design step ?
Well it is high time you generate all of them into your application within minutes!
In this chapter we are going to use averos framework to implement our use cases and start to experience them through our application.
II. Generate Use Cases
Let’s step back for a moment and recall the use cases we designed earlier.
According to our design, each business entity that is managed by an averos service, is subject to one or more use cases.
Let’s check them out one by one.
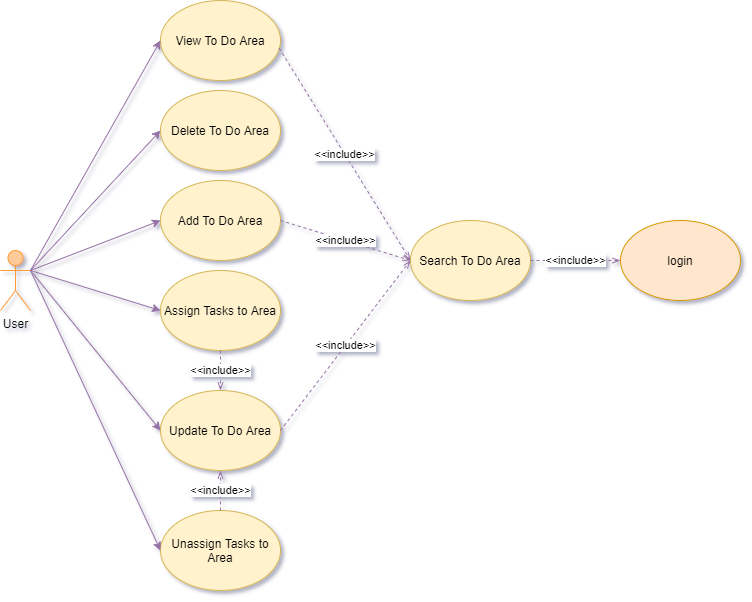
1. ToDoArea Use Cases
Our ToDoArea entity is subject to the following actions:
- Create
- Search (based on criteria filter)
- Export (to Excel format)
- Update/Modify
- Delete
- Assign
ToDo Tasks(a user can assign one or several tasks to a specific area of interest)- Unassign
ToDo Tasks(a user can unassign one or several tasks from a specific area of interest)
So as a result if you are willing to implement all of these use cases you might want to go ahead and create simple angular components for each one, then add your use case logic by designing your user interfaces, adding input validations and error messages and implementing the appropriate actions along with the right UI workflows.
Not to mention that you should build use cases that drive good user experience.
A tough work ahead I must say!
Fortunately, averos framework comes with a set of workflow commands that generates use cases that meet all the requirements mentioned above.
🔖 Please note that at this point,
averos frameworka set of wokflow commands that meets basic use cases requirements such ascrud.
Those command are:
create-entity-uc: which will result in the creation of acreate entityuse casesearch-entity-uc: which will result in the creation ofsearch entity,edit entity,view entityanddelete entityuse cases.advanced-crud: which combine the first two use cases in one shot.These commands will generate the following layouts:
- View Layout : the entity subject to this layout is displayed in read-only mode
- Edit Layout : the entity subject to this layout is displayed in write mode
- Search Layout: Is a composite layout, composed of a Search Input Layout and a Search Result Layout
- Search Input Layout: A simple Edit Layout with a default search action button
- Search Result Layout: A table that depicts the searched entities with the following use case actions:
table header actions:create,reload,export,select alluse case actionstable row actions:view,edit,delete,selectuse case actionscustomizable table row actions: any specific action. An entity described in a row is subject to this action (ex.close ticket,validate…).Since the vast majority of use cases UI are essentially derived from one of these layouts;
averos use case workflow commandcould thus be used to create any type of use case.🔖 Please note that
averos use casecomes with default actions. Additional use case actions have not been introduced to the framework so far. So at this point, if you are willing to add more actions to your use cases you will need to manually add them.
In this case you need to have solid experience working with typescript in the context of web development.
Nevertheless, work is in progress towards addingUse case actions workflow command, so expect new updates in this line anytime soon.
Now let’s identify the workflow commands that we are going to use:
- Create →
create ToDoArea use case→create-entity-uc- Search (based on criteria filter) →
search ToDoArea use case→search-entity-uc- Export (to Excel format) →
export ToDoAreas use case→advanced-crud- Update/Modify →
edit use case→advanced-crud- Delete →
delete use case→advanced-crud- Assign
ToDo Tasks(a user can assign one or several tasks to a specific area of interest) →add ToDoTask to ToDoAreas use case→edit ToDoArea use case→advanced-crud- Unassign
ToDo Tasks(a user can unassign one or several tasks from a specific area of interest) →remove ToDoTask from ToDoAreas use case→edit ToDoArea use case/select ToDoTask use case→advanced-crud
➡️ This brings us to conclude that advanced-crud could meet our ToDoArea use case requirements.
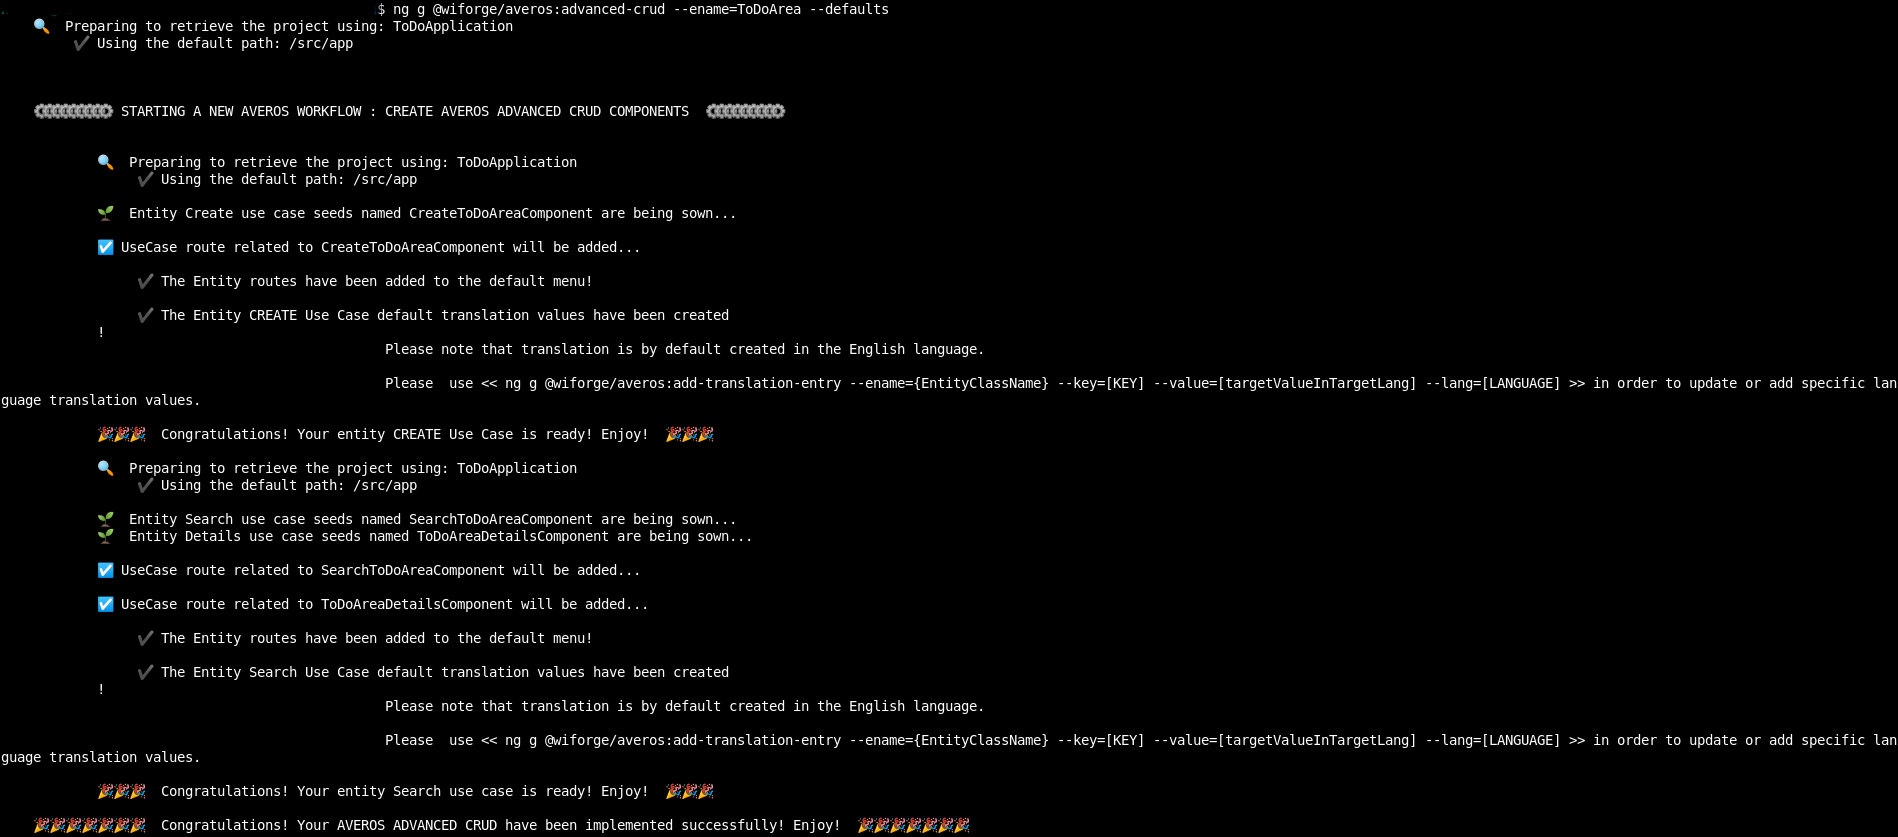
Go ahead and execute the following workflow command in order to trigger use case creation workflow and generate your use cases:
ℹ️ Please make sure you execute averos workflow commands UNDER YOUR PROJECT HOME FOLDER!
ng g @wiforge/averos:advanced-crud --ename=ToDoArea --defaults
The output of the command should look like the following:
Now how about getting a glimpse on what have changed in our application after adding ToDoArea use cases ?
Sounds great ?
Then go ahead and re-build/re-deploy your application by following these steps:
1. shutdown the running server
http-server
2. build and deployToDoApplicationby running the following command:ng build ToDoApplication && http-server -p 8081 -c-1 dist/to-do-application
Once ToDoApplication is up and running, go ahead navigate to http://localhost:8081
Here is what your application looks like:
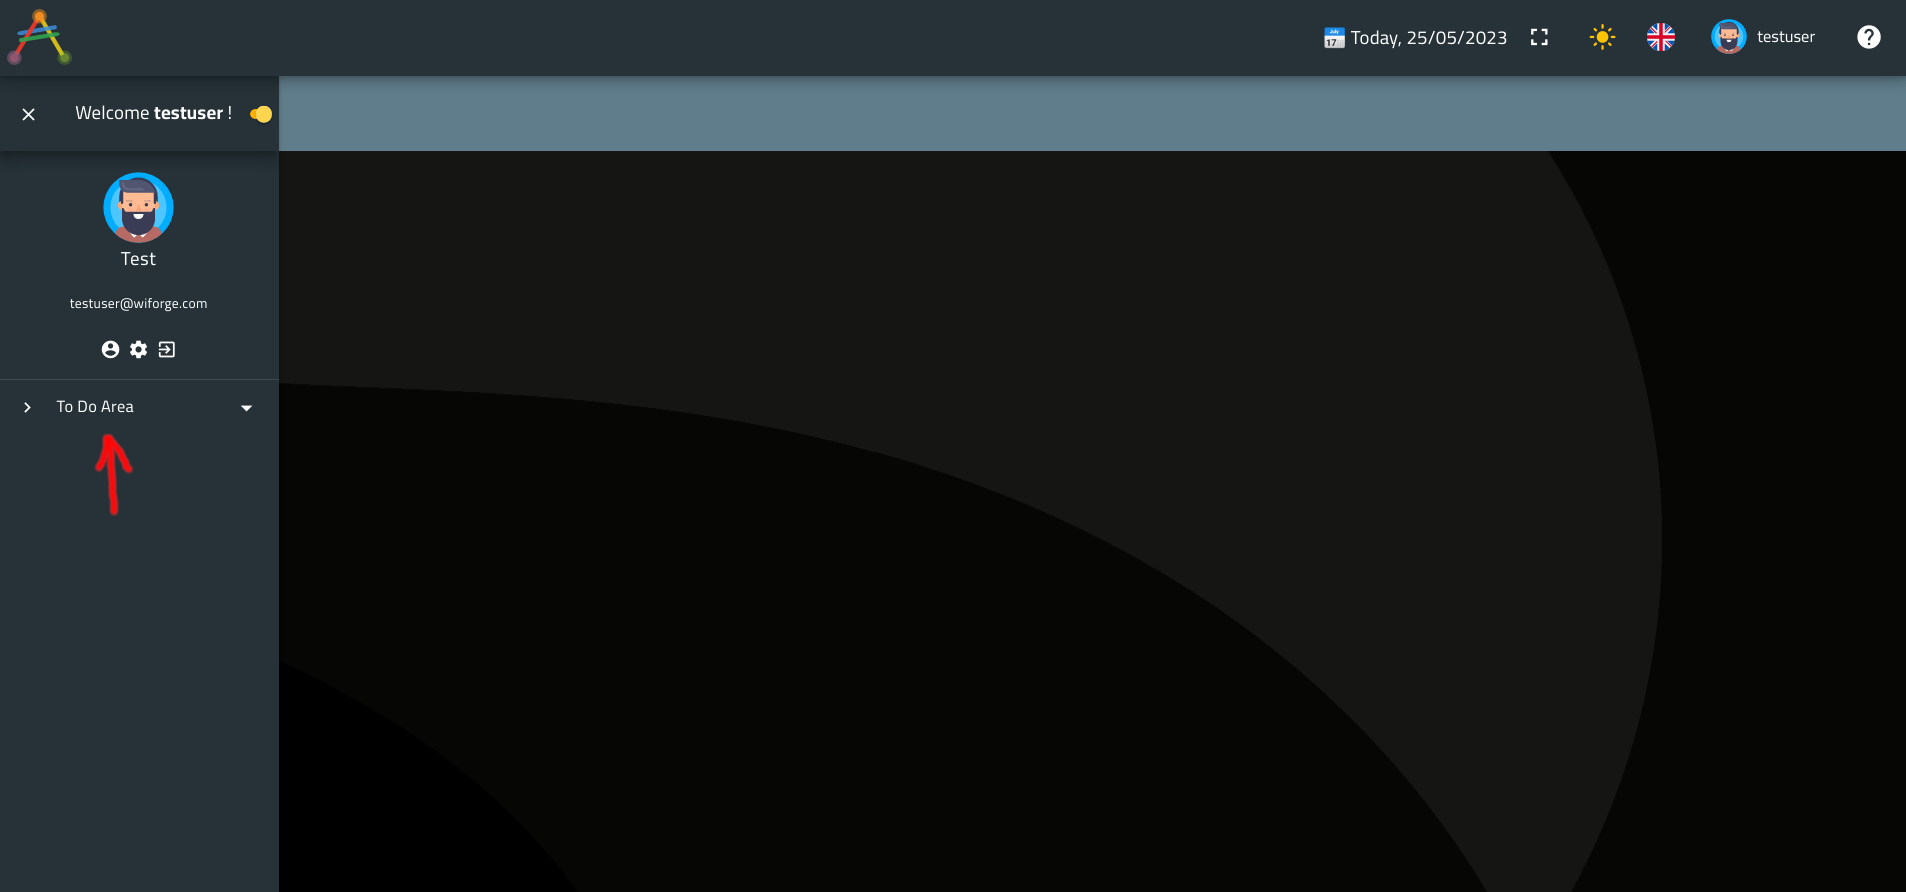
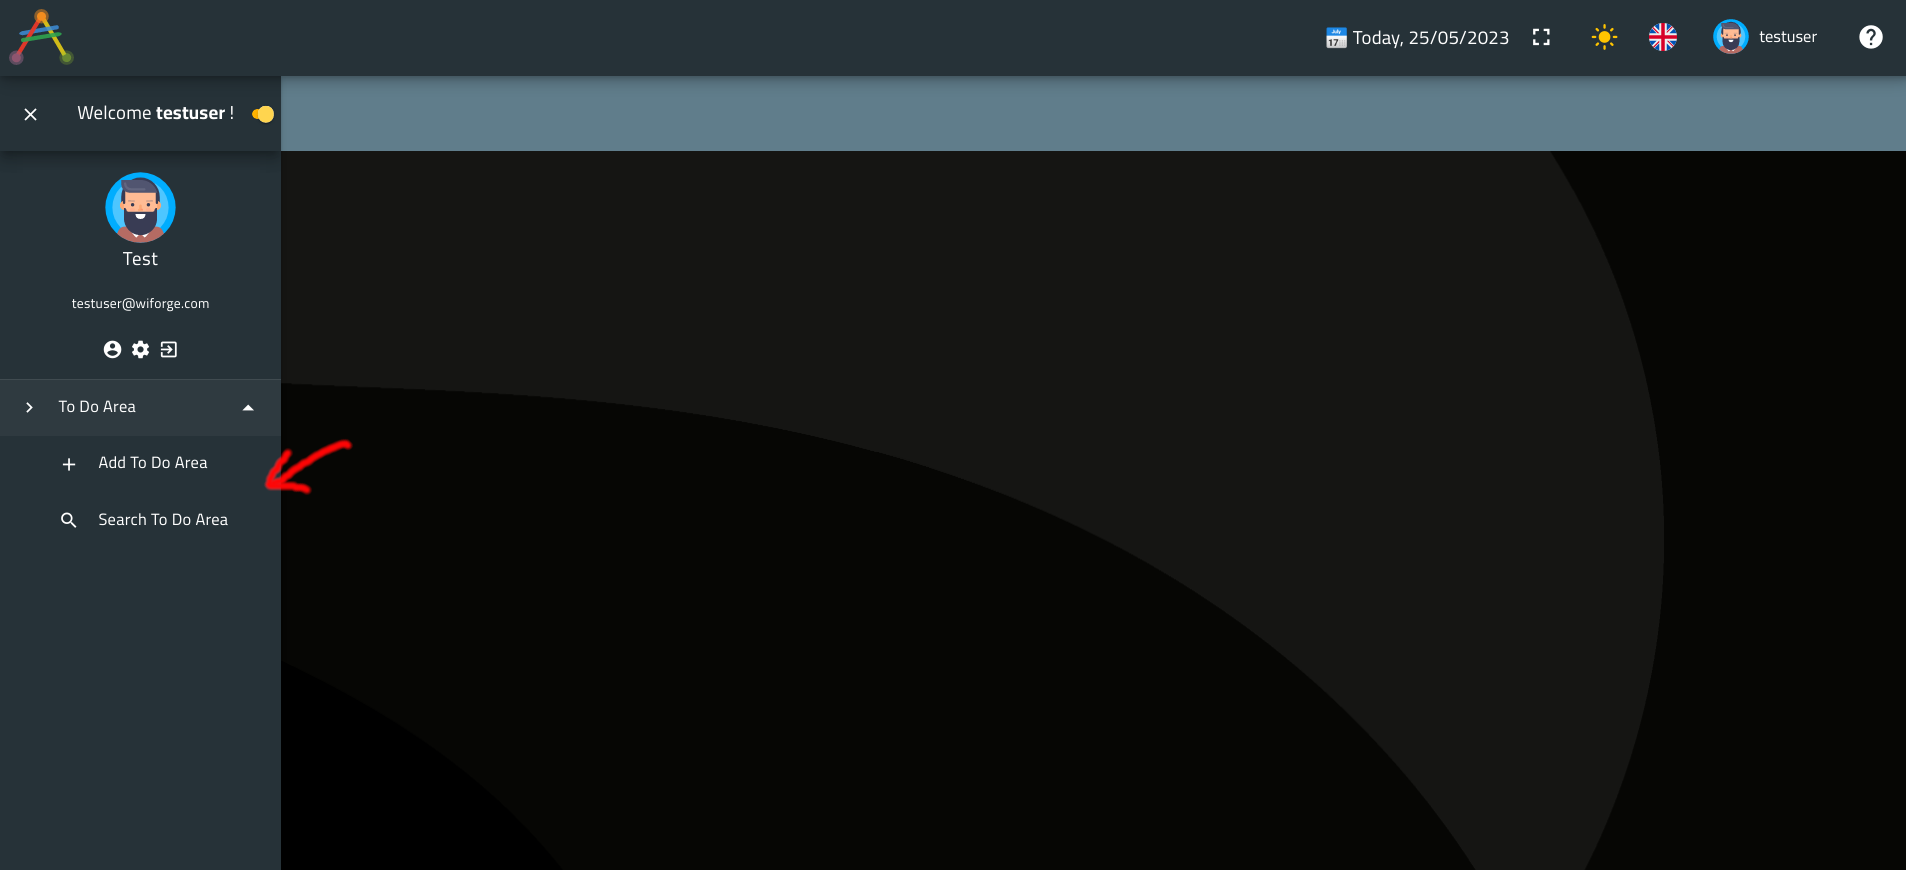
Did you spot the new menu group item that was added to your application menu ?
Well, this menu group called To Do Area, was actually generated by the previous averos workflow command advanced-crud.
Let’s go ahead and click on that item to unveil the items it hides.
Your ToDoApplication should look like the following:
ℹ️
averos use cases workflow commandsautomatically generates default menu items for each use case. By default, these menu items stand as routes to different use case components but can be customized at your will (grouping, translation, layout, visibility, target component…).
These menu items could be easely modified through a simple configuration.
Some of the menu configuration items are:
- icon: defines the menu icon to display in the menu link/group/submenugroup. Menu icons are specified based on their names as they are defined in the angular material icon specifications
- route: defines the target use case route
- disabled: wether the menu item should be disabled or not
- children: a list of sub menu items More on averos specifications is available in the detailed averos documentation.
🔖 Notice that averos have created as many menu entries as generated use cases; and grouped them by entity.
Two main menu items could be identified at this point, each implements a number of use cases:
- Add To Do Area
- →
create use case - →
edit use case - →
assign use case - →
unassign use case
- →
- Search To Do Area
- →
search use case - →
delete use case - →
update use case - →
edit use case - →
view use case - →
create use case - →
export use case - →
assign use case - →
unassign use case
- →
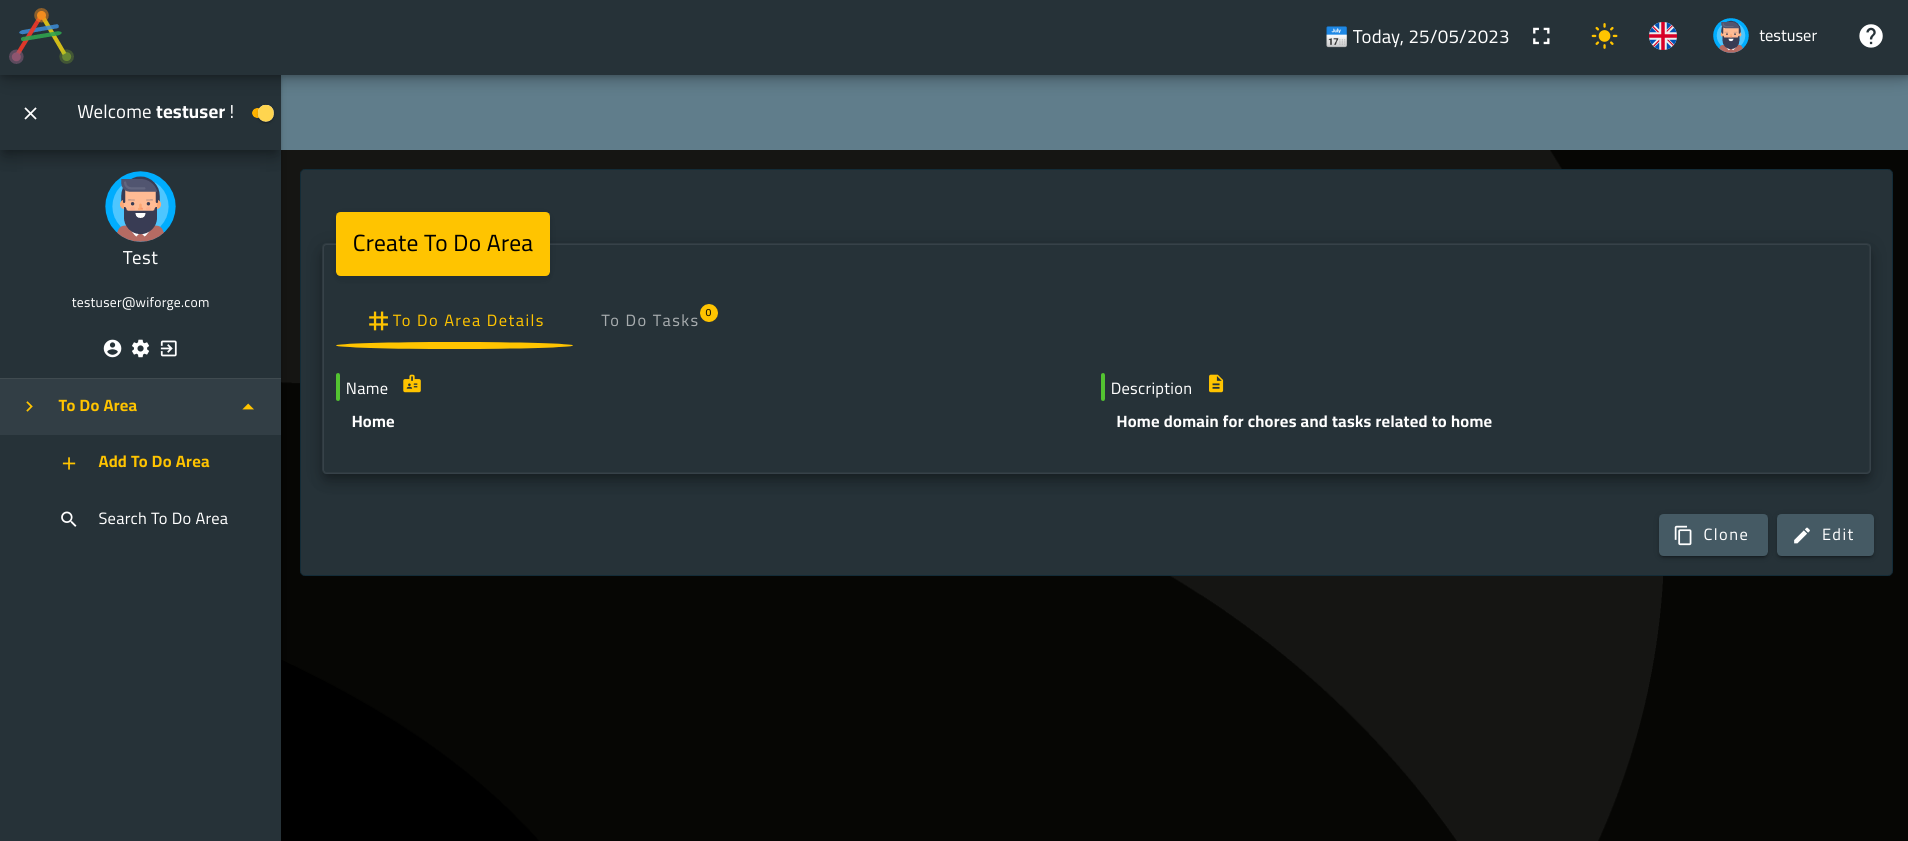
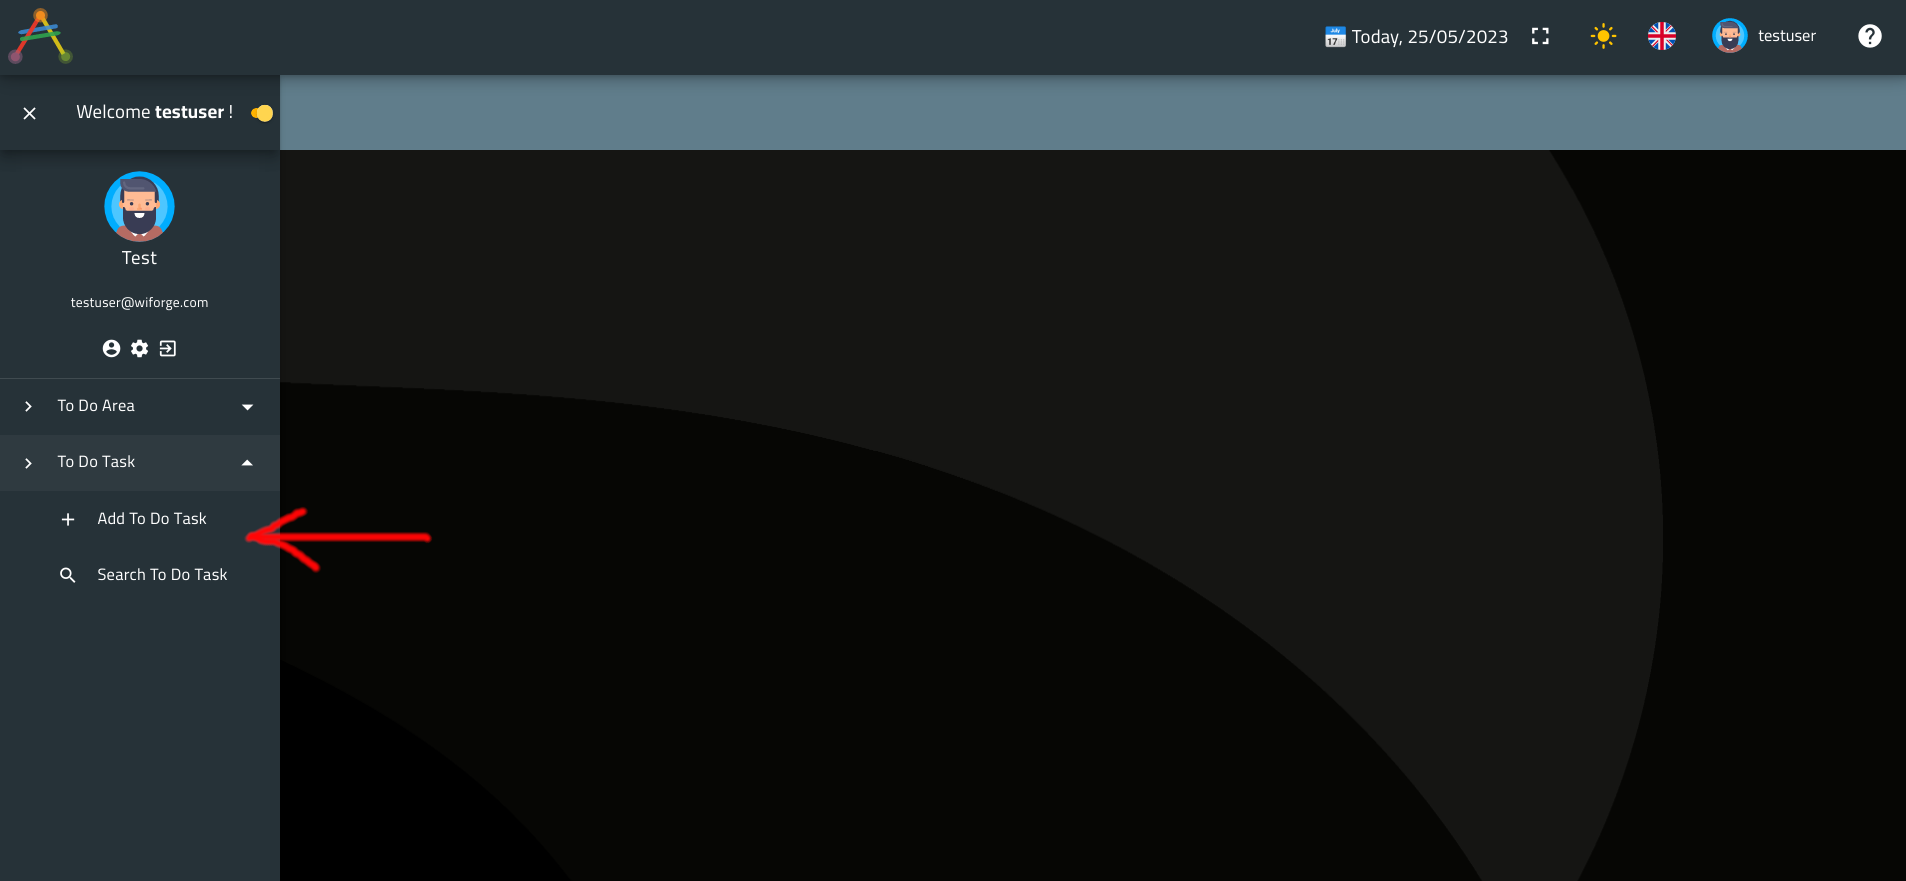
Let’s try Add To Do Area use case!
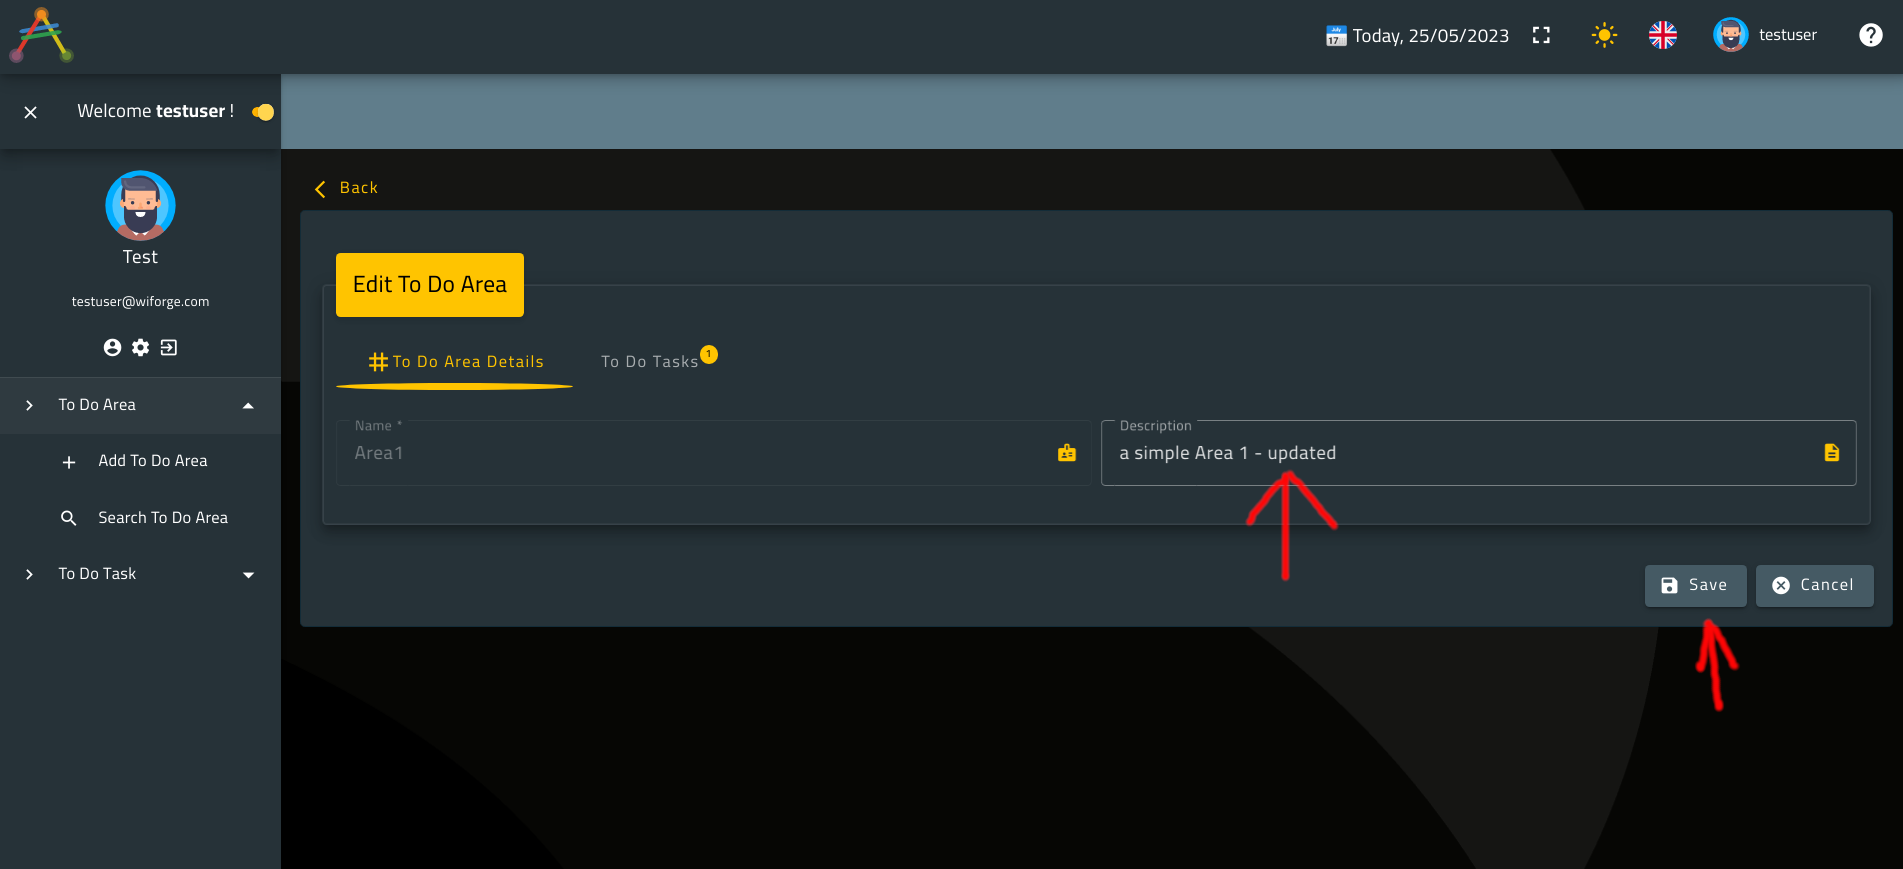
Go ahead and click on the menu link then try to create a new Task Domain. Here is what the UI looks like:

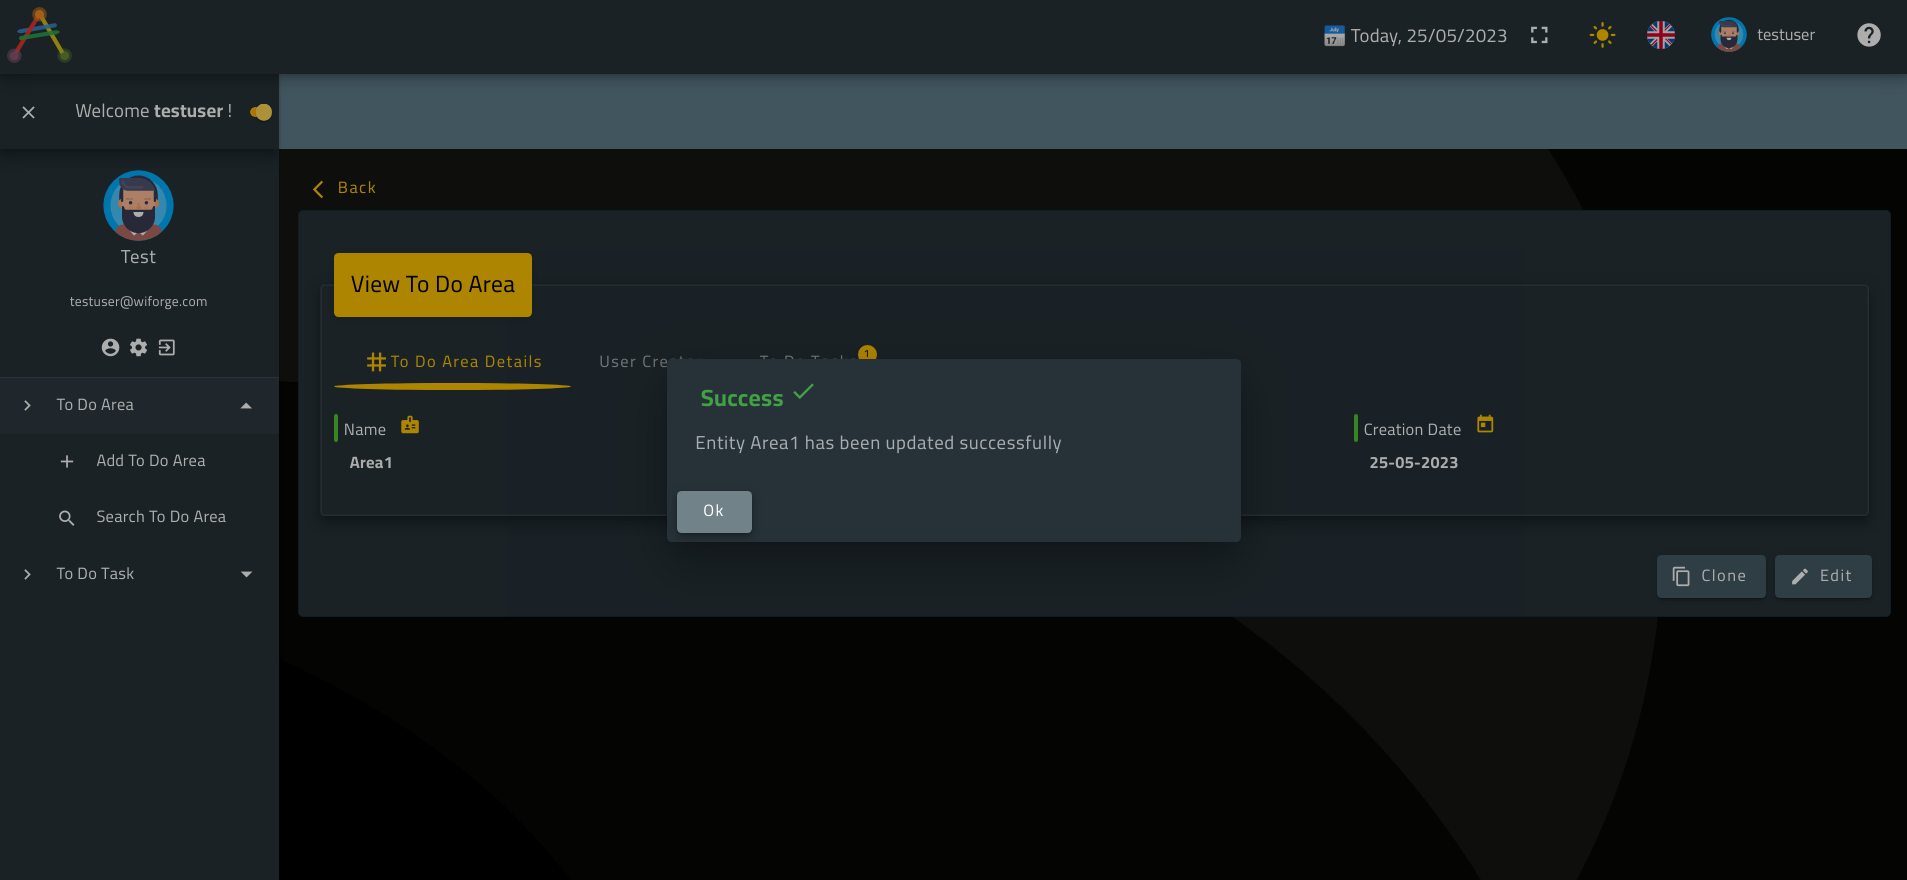
Now hit the save button to store your new record into the database.
Once your record is saved, a successfull message will pop up and the layout will switch to View Layout.
Here is what you might see:
ℹ️ The fields displayed on either Edit or View layout could be customizable.
This means that you can decide what entity members you want to display and what entity members you want to hide in these views through View Layout Configuration.
Also,averos frameworkallows you to configure additional field validations inEdituse cases (email validation, password, dependency with other field…) using Averos Validators.
Besides,averos frameworkgives the possibility to link value domains to fields through Averos Domain Controllers Configuration.
For the sake of simplicity, we will not delve into these topics.
Please refer to the averos documentation for further details about these features.
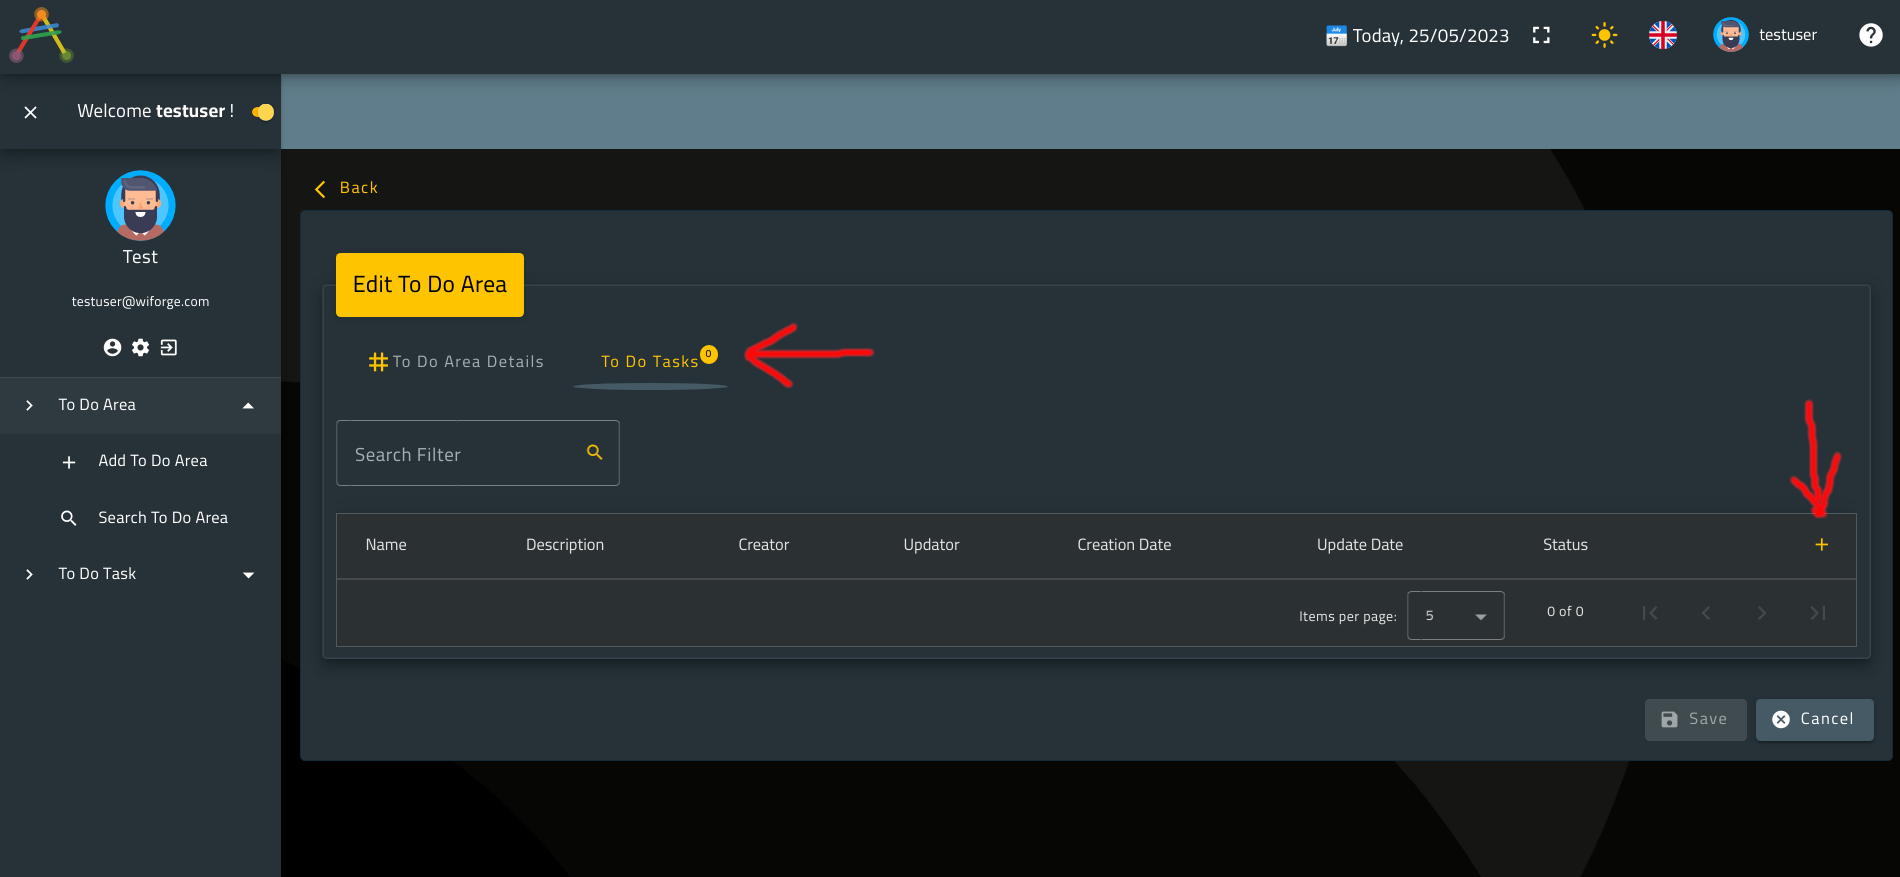
Note that relationship with ToDoTask is depicted by the tab named To Do Tasks. There you can assign/unassign ToDoTasks to/from a given ToDoArea.
Go ahead an click on that tab. You should see the following layout:
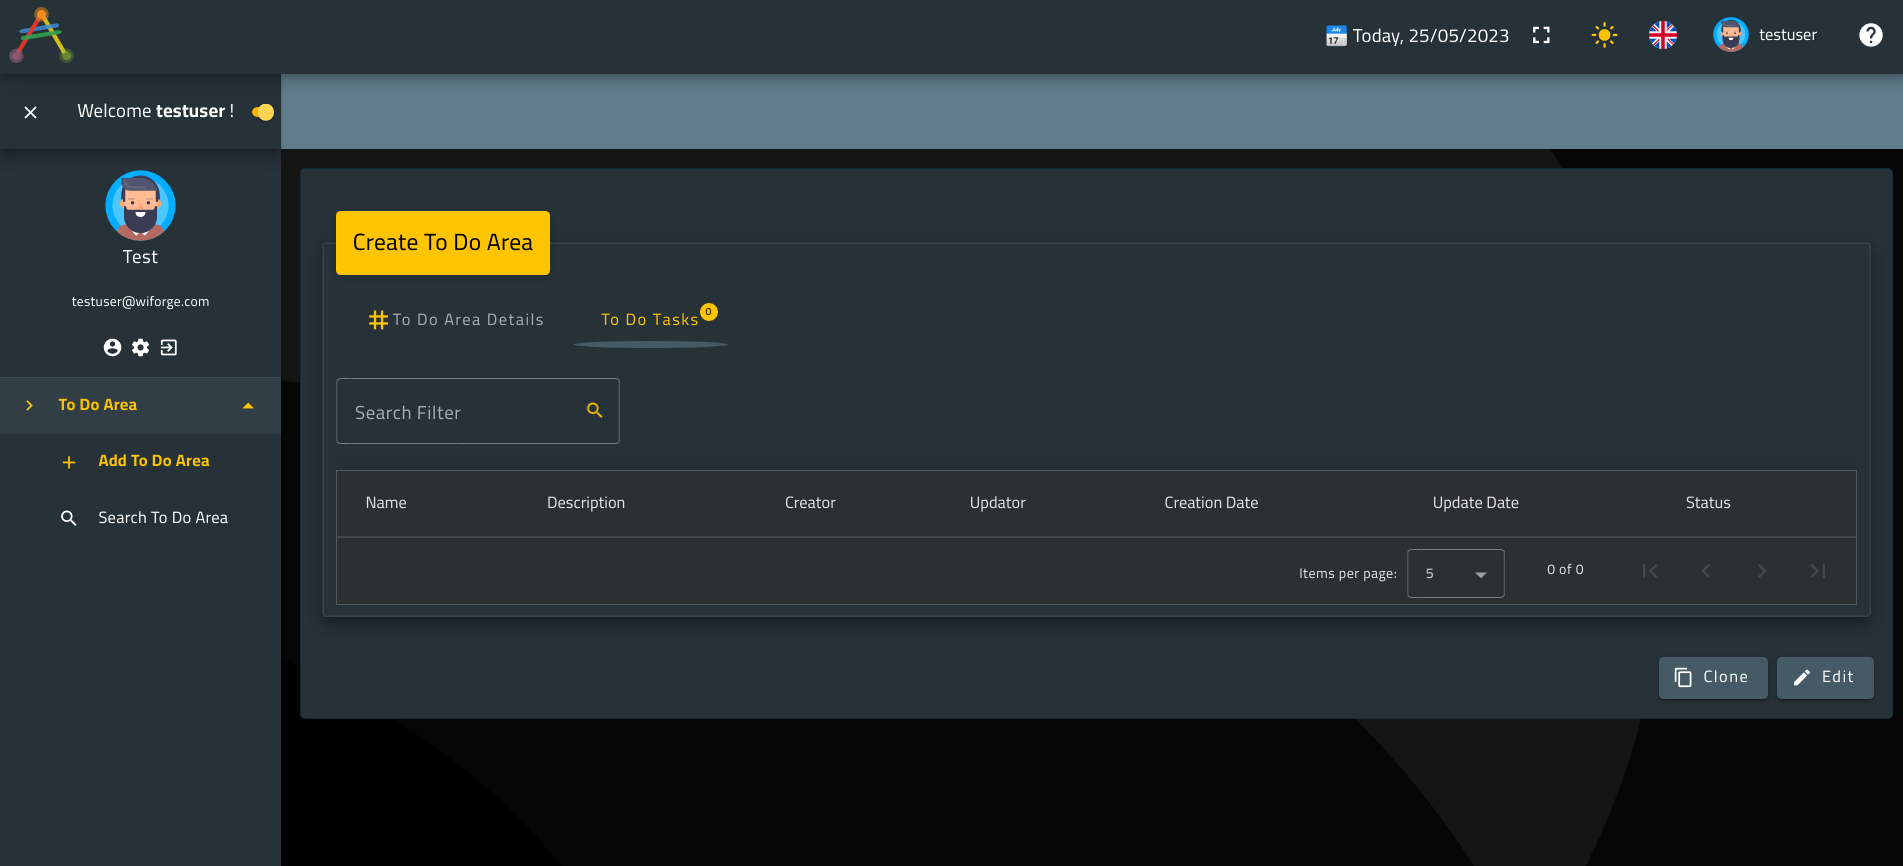
The list of ToDoTasks is empty for the moment, but we will be able to assign tasks very soon.
Now let’s have a look at Search To Do Area use case.
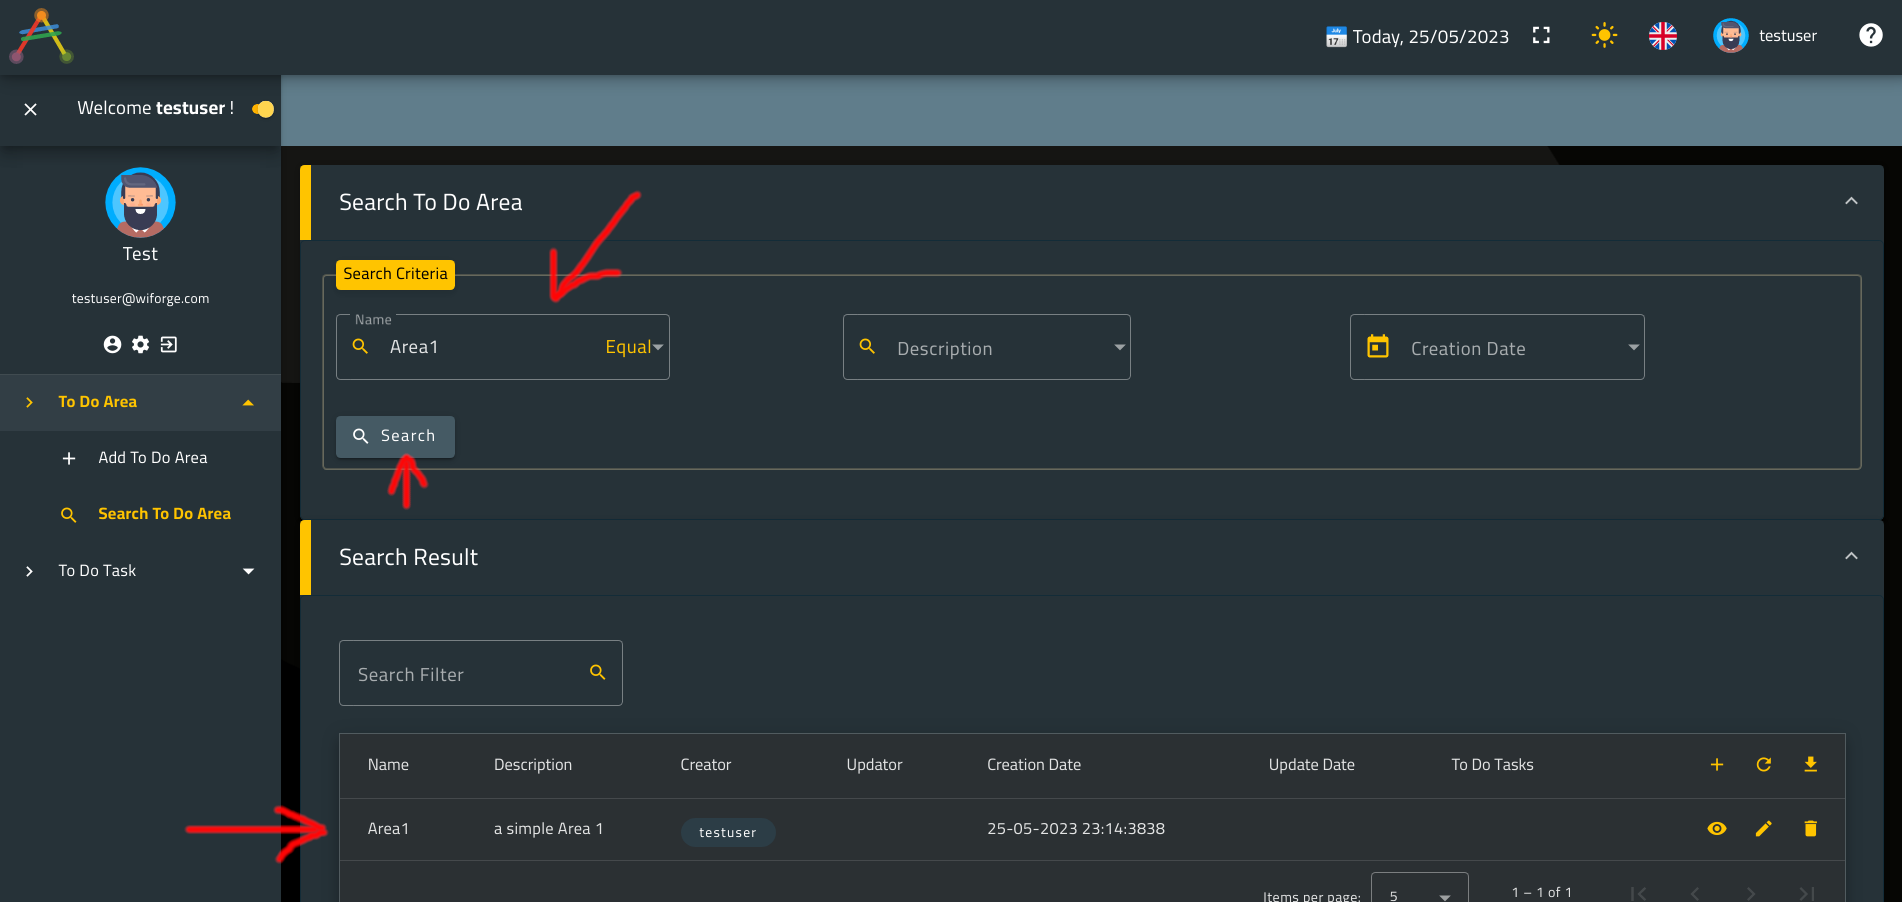
Go ahead and hit the Search To Do Area menu link; you shall see the following search filter screen:
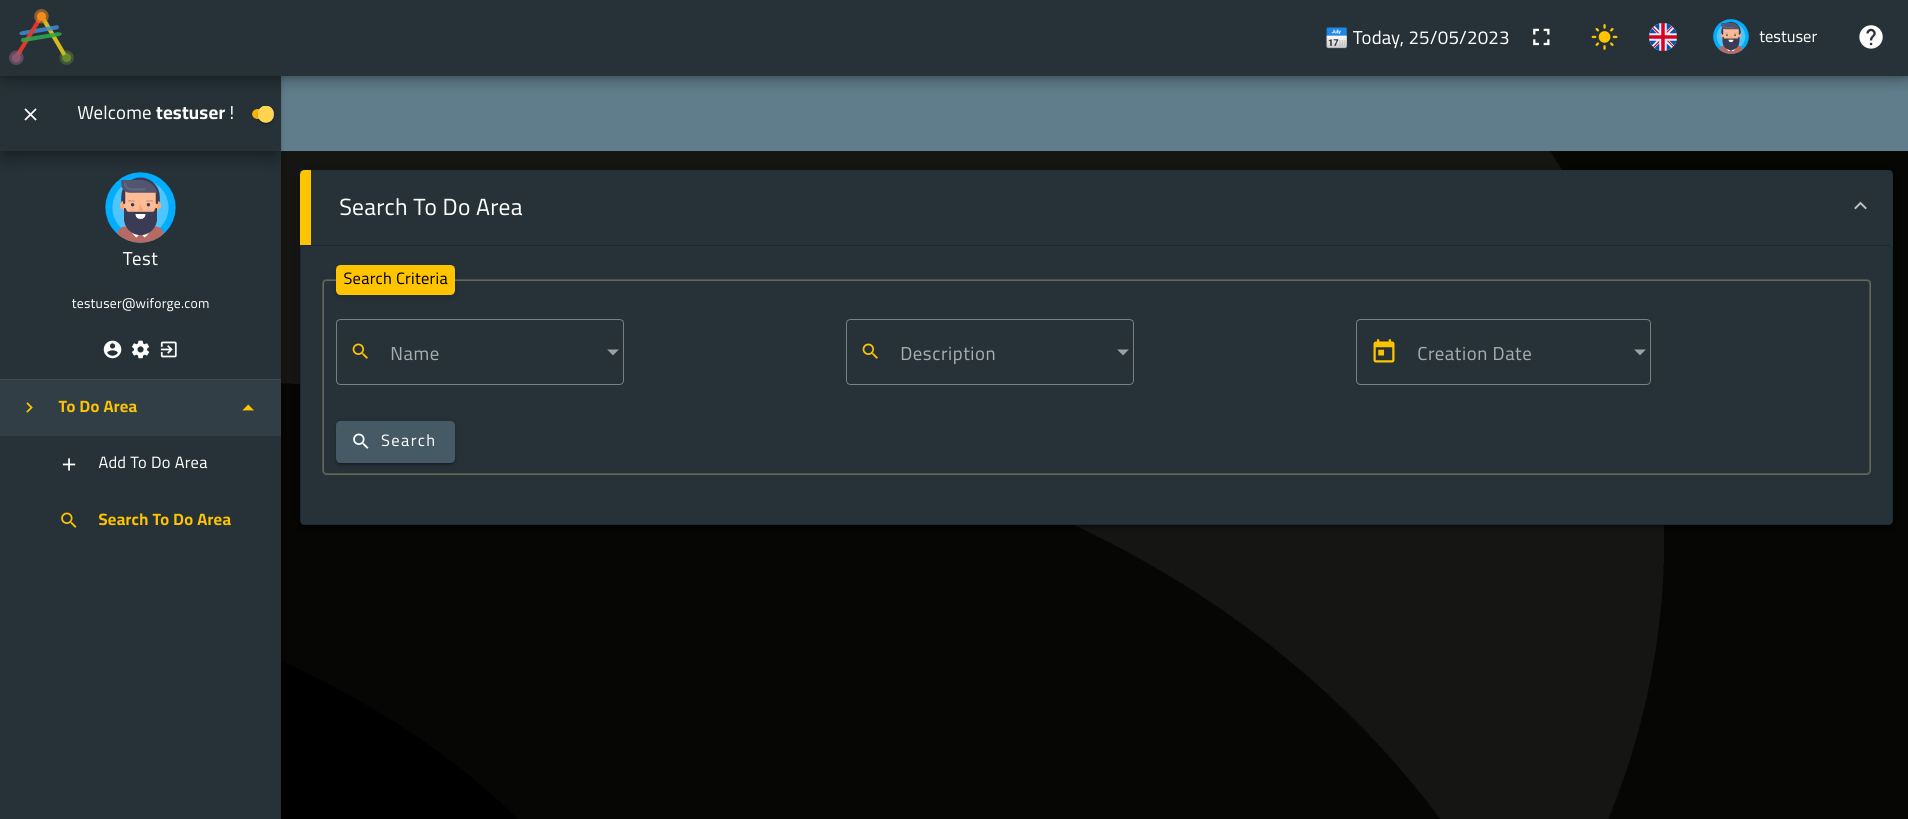
ℹ️ Note that
averos frameworkhas created a defaultSearch Input Layoutscreen for you.</br> This screen is composed of search input filters defined by the reserved membersname,descriptionandcreatedAt.
This is the default layout, but you might customize your search input screen by adding more criteria members from the list of available entity members using the View Layout Configuration. However, for the sake of this tutorial we won’t delve further into this advanced features.
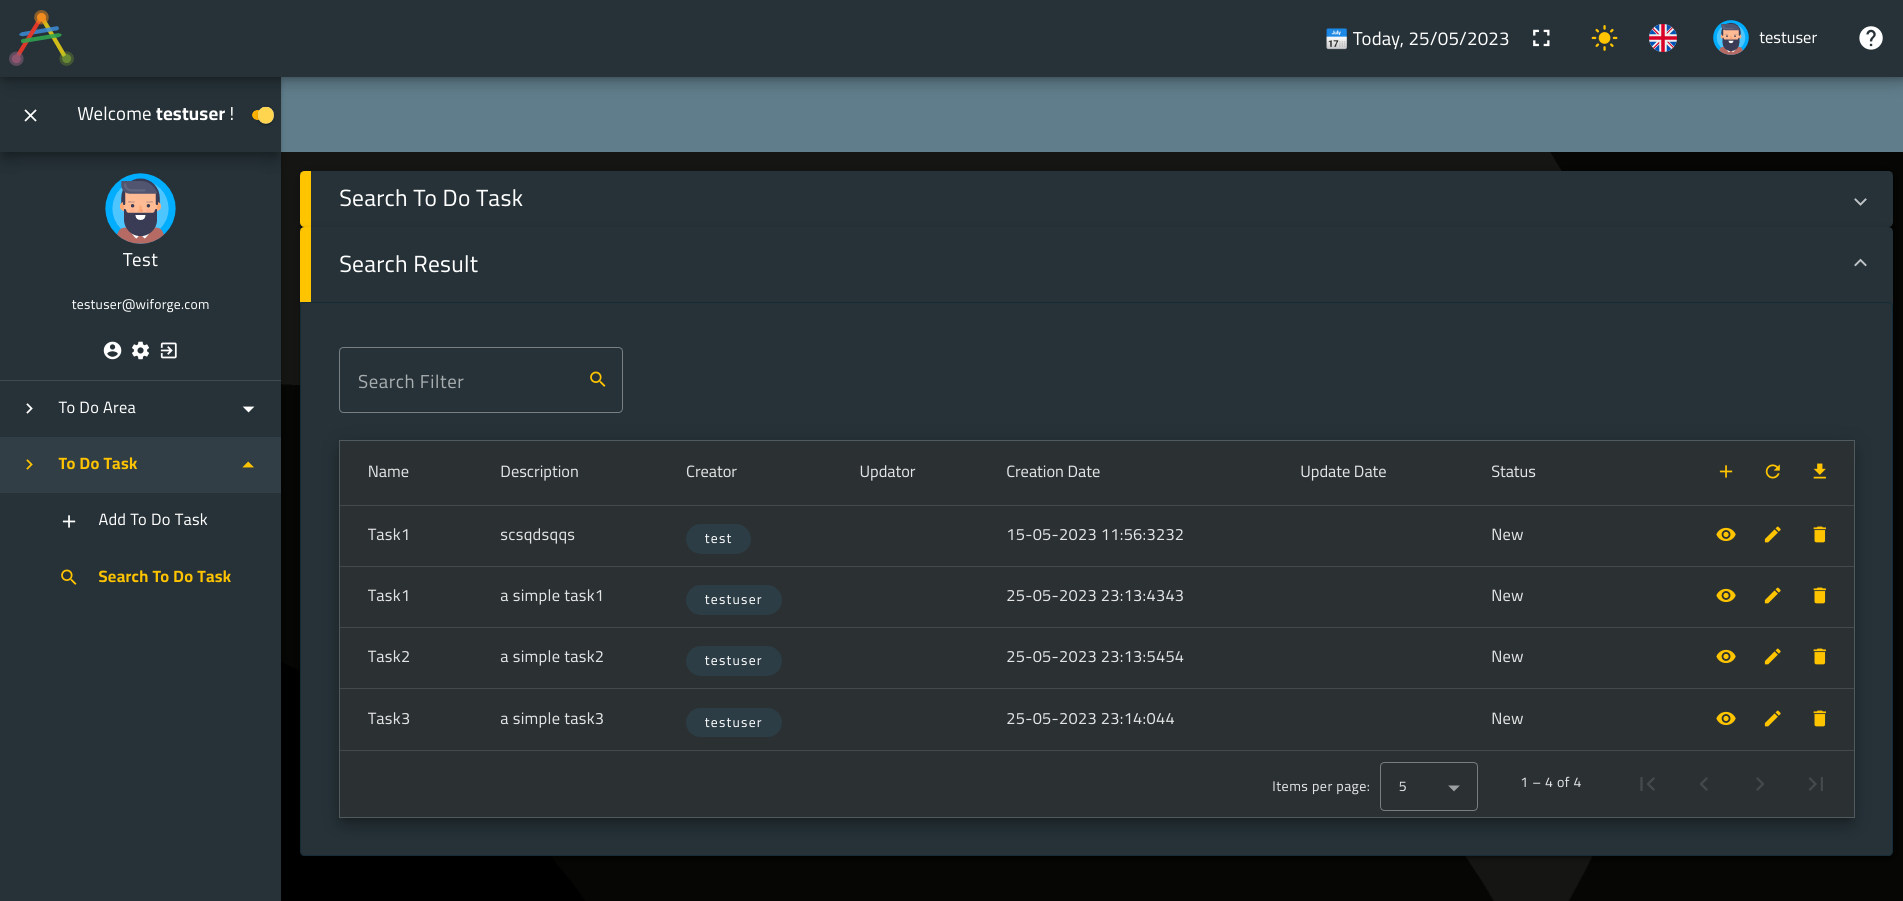
Go ahead and perform a search action. You shall see the following result:
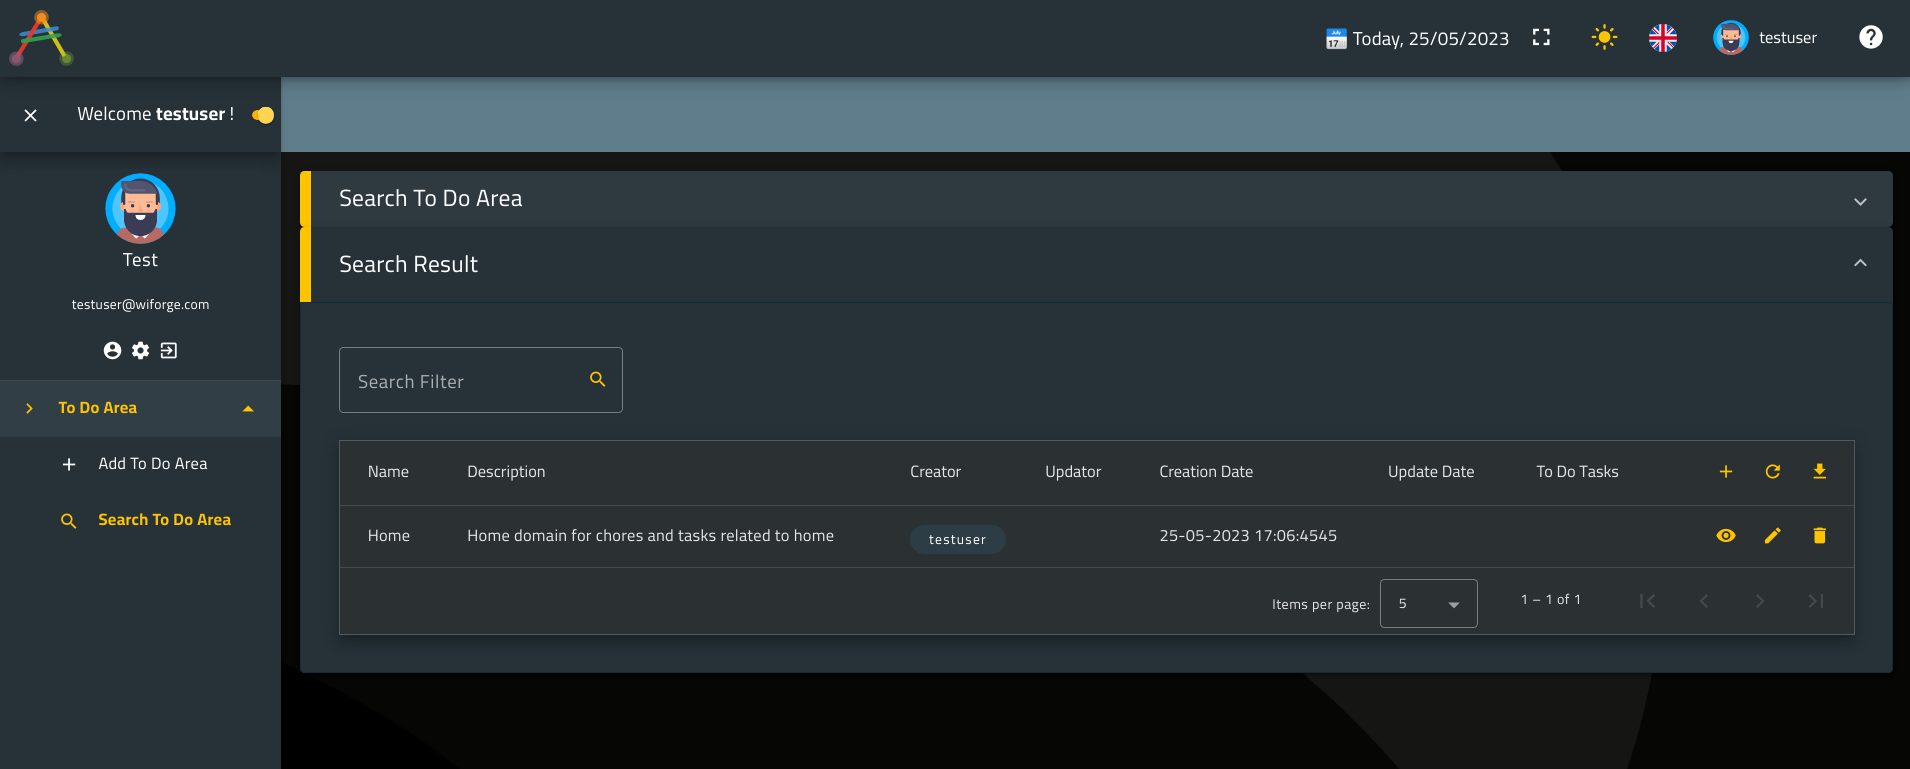
Remember we spoke about search result table actions earlier ?
Well, those are the actions buttons located in the last column of the table.
The upper left three actions are create, reload and export.
Those are default table header actions and are applied to the whole search result entities.
On the other hand, default row actions are located on each row in the last column. Those three actions are view, edit and delete and they are applied to each related entity.
So as you have already figured it out, in addition to Averos Create Use Case, Averos Search Use Case allows entity creation as well. This comes handy from user experience perspective.
Now let’s try another thing! shall we ?
Earlier we spoke about export use case but we’ve never seen it.
From the Search Result screen, hit the export button located at the table header actions area.
You should see the following screen:
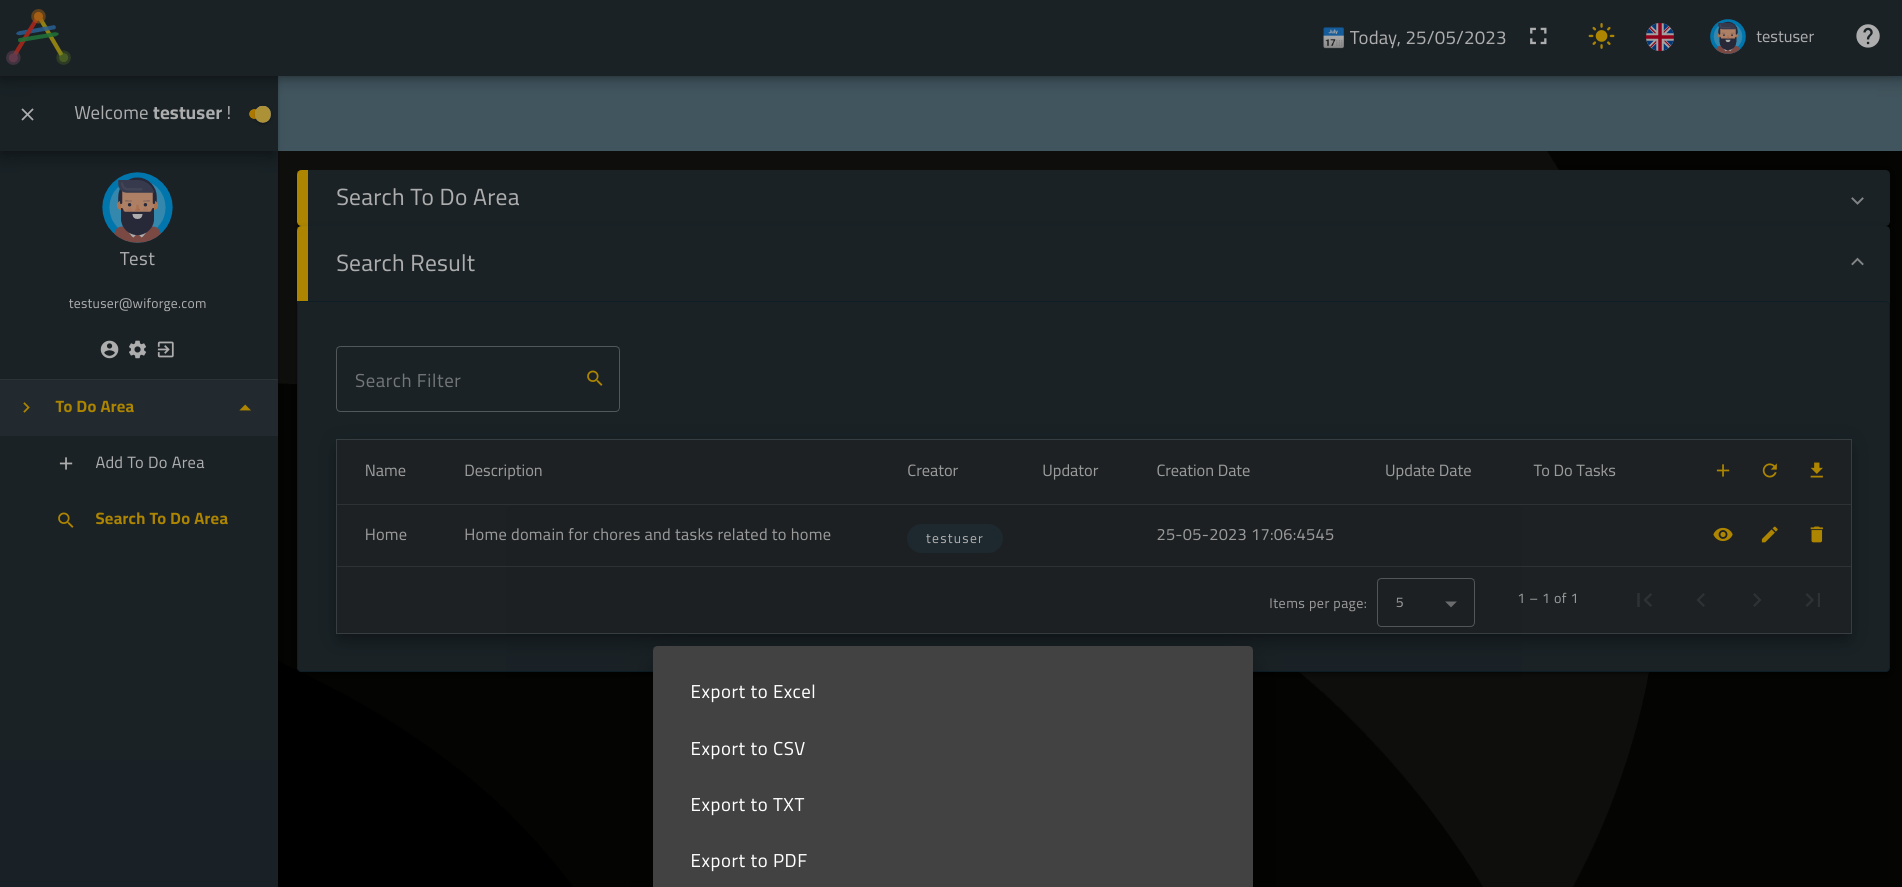
Click on Export To Excel. All the available search result entities will be exported to an excel file which will be downloaded to your internal disk.
ℹ️ Note that the current
averos frameworkversion provides only excel format.
Other export formats will be available in future versions.
At this point you might try all the available use cases just to make sure everything is as expected.
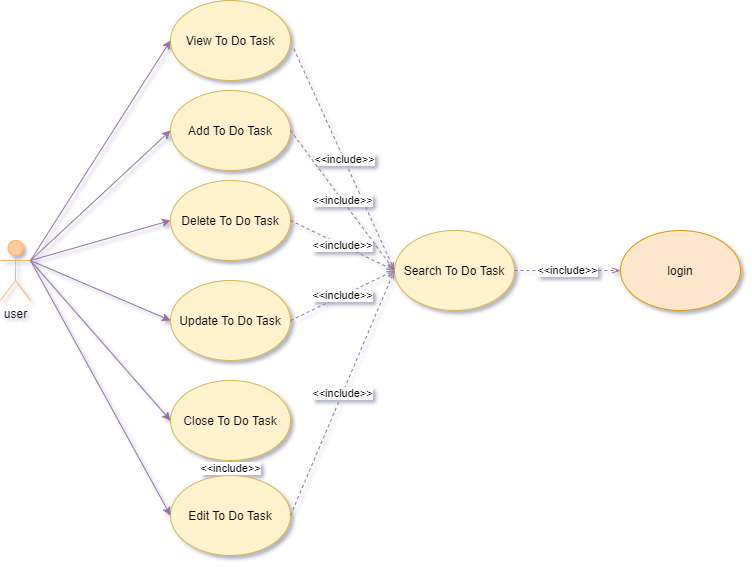
2. ToDoTask Use Cases
According to the design we made earlier, our ToDoTask entity is subject to the following actions:
- Create
- Search (based on criteria filter)
- Export (to Excel format)
- Update/Modify
- Delete
- Activate a
ToDo Task- Close a
ToDo Task
As we did for ToDoArea entity, let’s identify the workflow commands that we are going to use for ToDoTask use case:
- Create →
create ToDoTask use case→create-entity-uc- Search (based on criteria filter) →
search ToDoArea use case→search-entity-uc- Export (to Excel format) →
export ToDoTasks use case→search-entity-uc- Update/Modify →
edit use case→search-entity-uc- Delete →
delete use case→search-entity-uc- Activate
ToDo Task(a user might change the status of a ToDoTask to Activated) →edit ToDoTask use case→search-entity-uc- Close
ToDo Task(a user might change the status of a ToDoTask to Closed) →edit ToDoTask use case→search-entity-uc
➡️ This brings us to conclude that both create-entity-uc and search-entity-uc could meet our ToDoTask use cases requirements.
ℹ️ Note that since we’ve already seen the workflow command
advanced-crud, we decided to usecreate-entity-ucandsearch-entity-ucthis time since they are also in line with our target use cases requirements.
Also, you may be wondering, why did we choosesearch-entity-ucas the workflow that will generateedit,viewanddeleteuse cases.
Well, the choice is based on the fact that in order to achieve one of those three actions, the user should select one entity beforehand.
Choosing an entity comes in the context of a search action. That’s whysearch-entity-ucis fine for such cases.
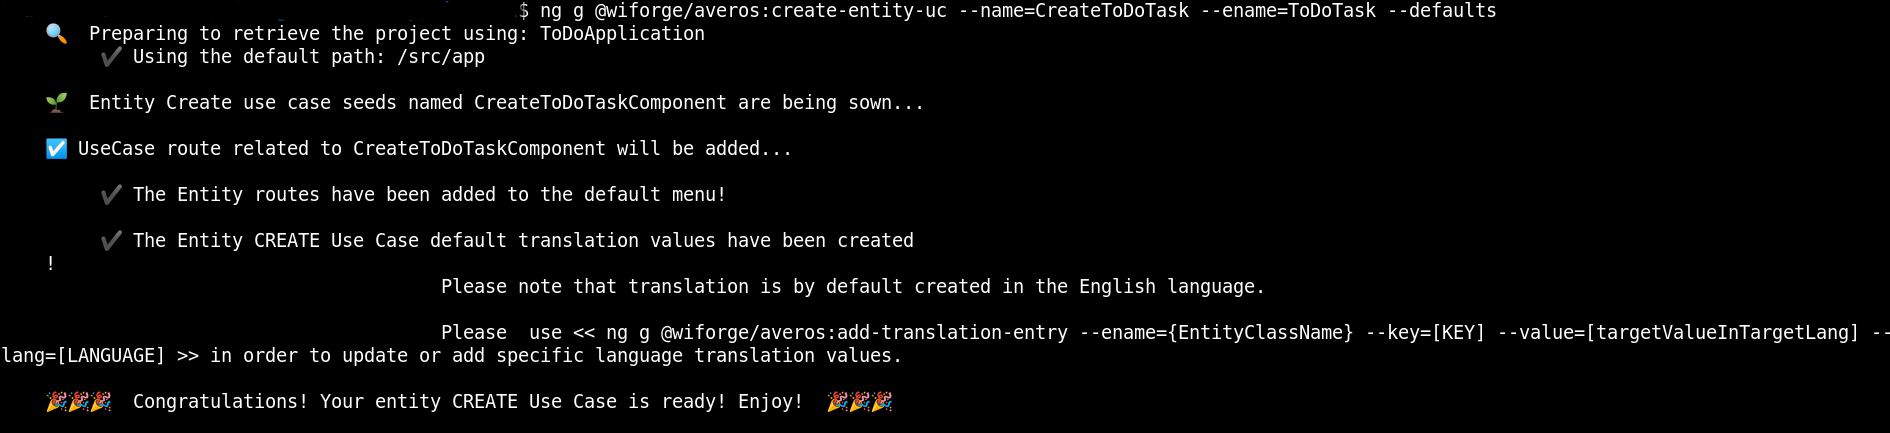
Go ahead and execute the following command to generate a create ToDoTask use case:
ng g @wiforge/averos:create-entity-uc --name=CreateToDoTask --ename=ToDoTask --defaults
You should see something similar to the following output:
Now let’s finish our use case generation and create the final use cases in the list.
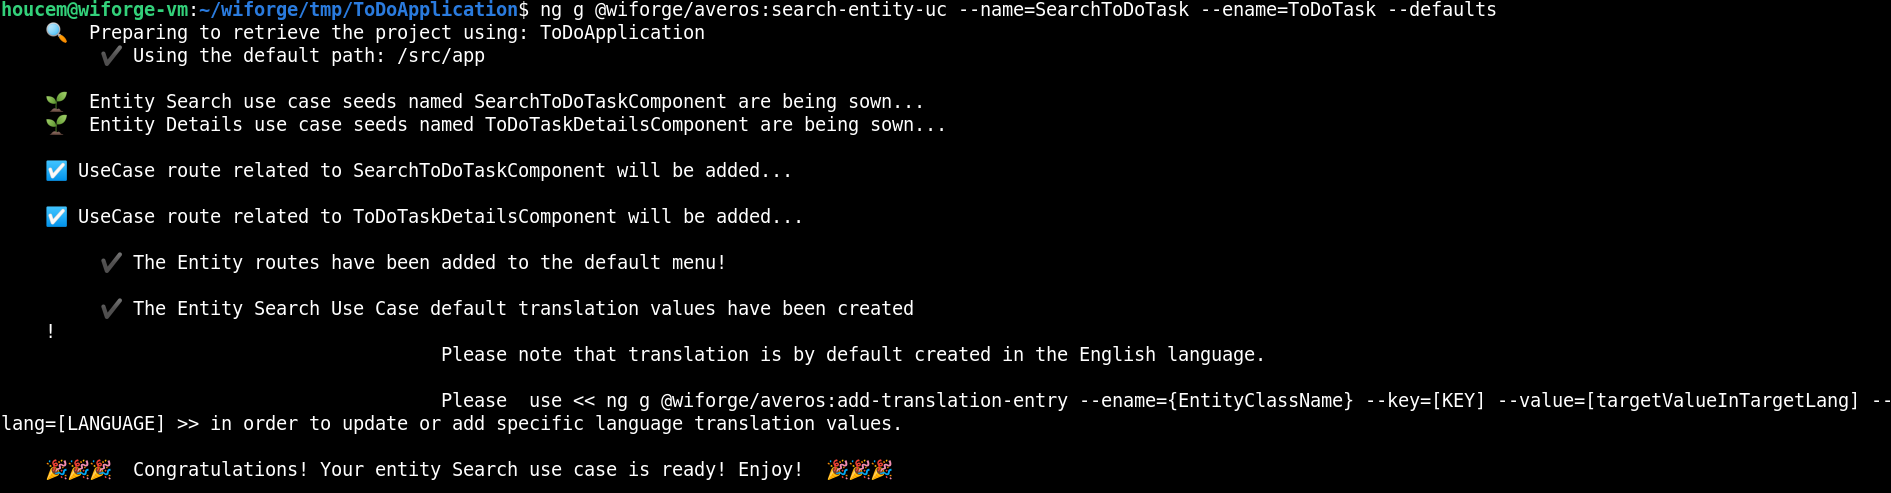
Go ahead and execute the following command:
&& ng g @wiforge/averos:search-entity-uc --name=SearchToDoTask --ename=ToDoTask --defaults
The output of this command should look like the following:
Let’s go ahead and re-build/re-deploy your application by following these steps:
1. shutdown the running server
http-server
2. build and deployToDoApplicationby running the following command:ng build ToDoApplication && http-server -p 8081 -c-1 dist/to-do-application
Once ToDoApplication is up and running, go ahead navigate to http://localhost:8081
Here is what your application looks like:
As expected two menu items were added to your application menu: Add ToDo Task and Search ToDo Task.
Let’s checkout the ToDoTask creation screen. It should look like the following:

I left the name empty on purpose to show you the field validation behaviour.
Did you spot the error message ?
ℹ️ Averos Validators Configuration provides you a way to add your own validations along with customizable error messages.
Also, it worth mentioning that any error messages could be translated into the current user language if your application supports multi-languages.
Don’t worry we will delve deep intoaveros translationin the upcoming chapter.
Remember the field status ?
In the previous chapter, when we generated entity members, we specified the member status as an enumeration and defined its value as Active, Closed and New.
By default Averos framework generates a combobox layout, in the Edit Layout, for this type of members.
ℹ️ Regarding members of type
enumeration, you might wish to display the enumeration values or domain values in the current user language.
Again, this could be done by configuration usingaveros translation.
Now, we are going to:
- create several new tasks (three are fine)
- create several Task Areas (two are fine)
- assign Tasks to Areas
- activate a task
Let’s start by creating three new Task [Task1, Task2, Task3] elements and two Area elements [Area1, Area2].
ℹ️TIP Use the action
clonefrom theviewentity layout to create a new entity identical to the previous saved one.
As mentioned earlier, once you create an entity viaCreate entity UC, the layout will be switched toView Layoutand thecloneaction will be available to you.

Now go ahead and assign each Task to its related area as follows:
- Task1 → Area1
- Task2 → Area2
- Task3 → Home
Go to To Do Area menu group and hit Search To Do Area menu link item then search for Area1.
Edit Area1 search result entry then click on the tab named To Do Tasks which depicts the relationship with ToDoTask.
Click on the add botton located in the table header actions as shown above.
A set of ToDoTask entries will be displayed.

Select the appropriate task to be assigned to Area1 (Task1) then hit the select button located in the table row actions related to the entry named Task1 as shown in the previous picture,

ℹ️Note that at this point,
Area1is still not changed, that’s whysavebutton remains disabled.
This means that, if you search again for your entity you wont findTask1assigned to it.
In the current version,Averos Frameworkdoes not use entity relationships in the evaluation of the state of a given entity.
Only simple members state count.
That’s way, you need to change at least one simple member state so that you will be able to save your entity.
This behaviour might change in the future framework versions.
Go back to To Do Area Details tab, you will want to modify at least one simple member (description for example) then save your entity.
ℹ️ Notice that once you updated an entity simple member,
savebutton changed to visible.
This is because any change in the state of an entity simple member will trigger a change in the state of the entity.
Do the same for the (Task2 and Task3).
Our application is almost finished!
Now, the last use case we are going to implement is Activate/Close a Task.
One way to think about this use case is to simply edit the task whose status should be updated then perform the right update (change status to Active or Closed).
The other way to design this use case is to add a customizable dynamic row action in the Search Result View that either activates or close a task.
In this case, the customizable row action is displayed depending on the current task status. If task status is New then the row action activate is displayed otherwise the row action close would be displayed instead.
Moreover, averos service functions should be created and bound to these customizable actions in order to trigger the requested business logic behind.
As mentioned earlier, averos framework provides a way to create customizable row actions in the Search Result Layout. However we are not going to delve any further into this advanced features as we want to keep this tutoril as much as simple.
Advanced averos capabilities will be subject to another tutorial in the future.
Below is an example of averos customizable actions excerpt from WiBuild, our nocode application, built around Averos Framework:
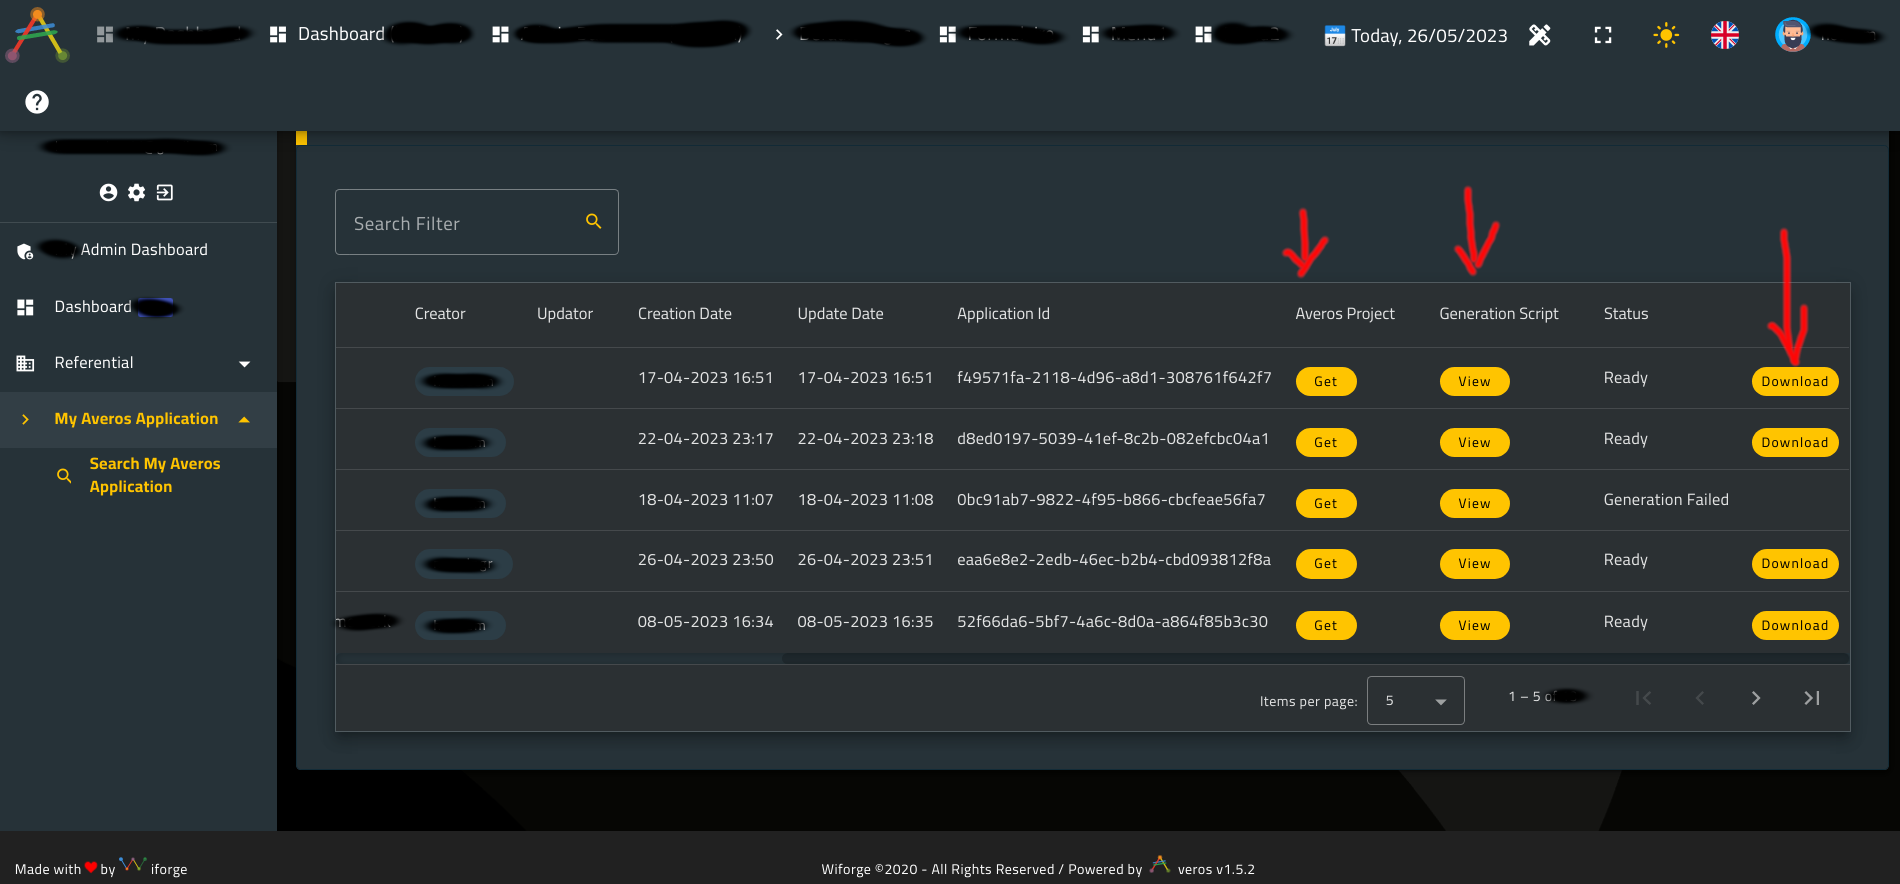
ℹ️Note that we have added three additional dynamic row actions named Get, View and Download.
Also, notice how those actions does not exist for all records.
This is because these actions are displayed dynamically for each record, depending on specific user criteria.
3. Averos Blank Pages
Now, imagine you would like to create a personal page with a link to the menu in the public context.
A blank page that you will populate yourself (a public dashboard or a very special use case for example, ).
ℹ️Averos provides a workflow command that allows to create a blank page in either public or private contexts, with or without a menu link.
A blank page is simply an empty angular component that is intended to help developers customize their own use cases, if they wish to.
Averos users could decide in which access context the component will be available (public, private or both).
Averos users could choose whether to create and show a default menu link in the chosen context or not.
In this tutorial, you are going to create a blank page named MyPublicPage in the public context and add a link to this page in the public menu (top menu).
Let’s go ahead and execute the following averos workflow command to create MyPublicPage:
ng g @wiforge/averos:create-page --name=MyPublicPage --target-menu=top --space=public --update-route-menu --defaults
Now go ahead and re-build/re-deploy your application by following these steps:
1. shutdown the running server
http-server
2. build and deployToDoApplicationby running the following command:ng build ToDoApplication && http-server -p 8081 -c-1 dist/to-do-application
Once ToDoApplication is up and running, go ahead navigate to http://localhost:8081
Here is what your application looks like:
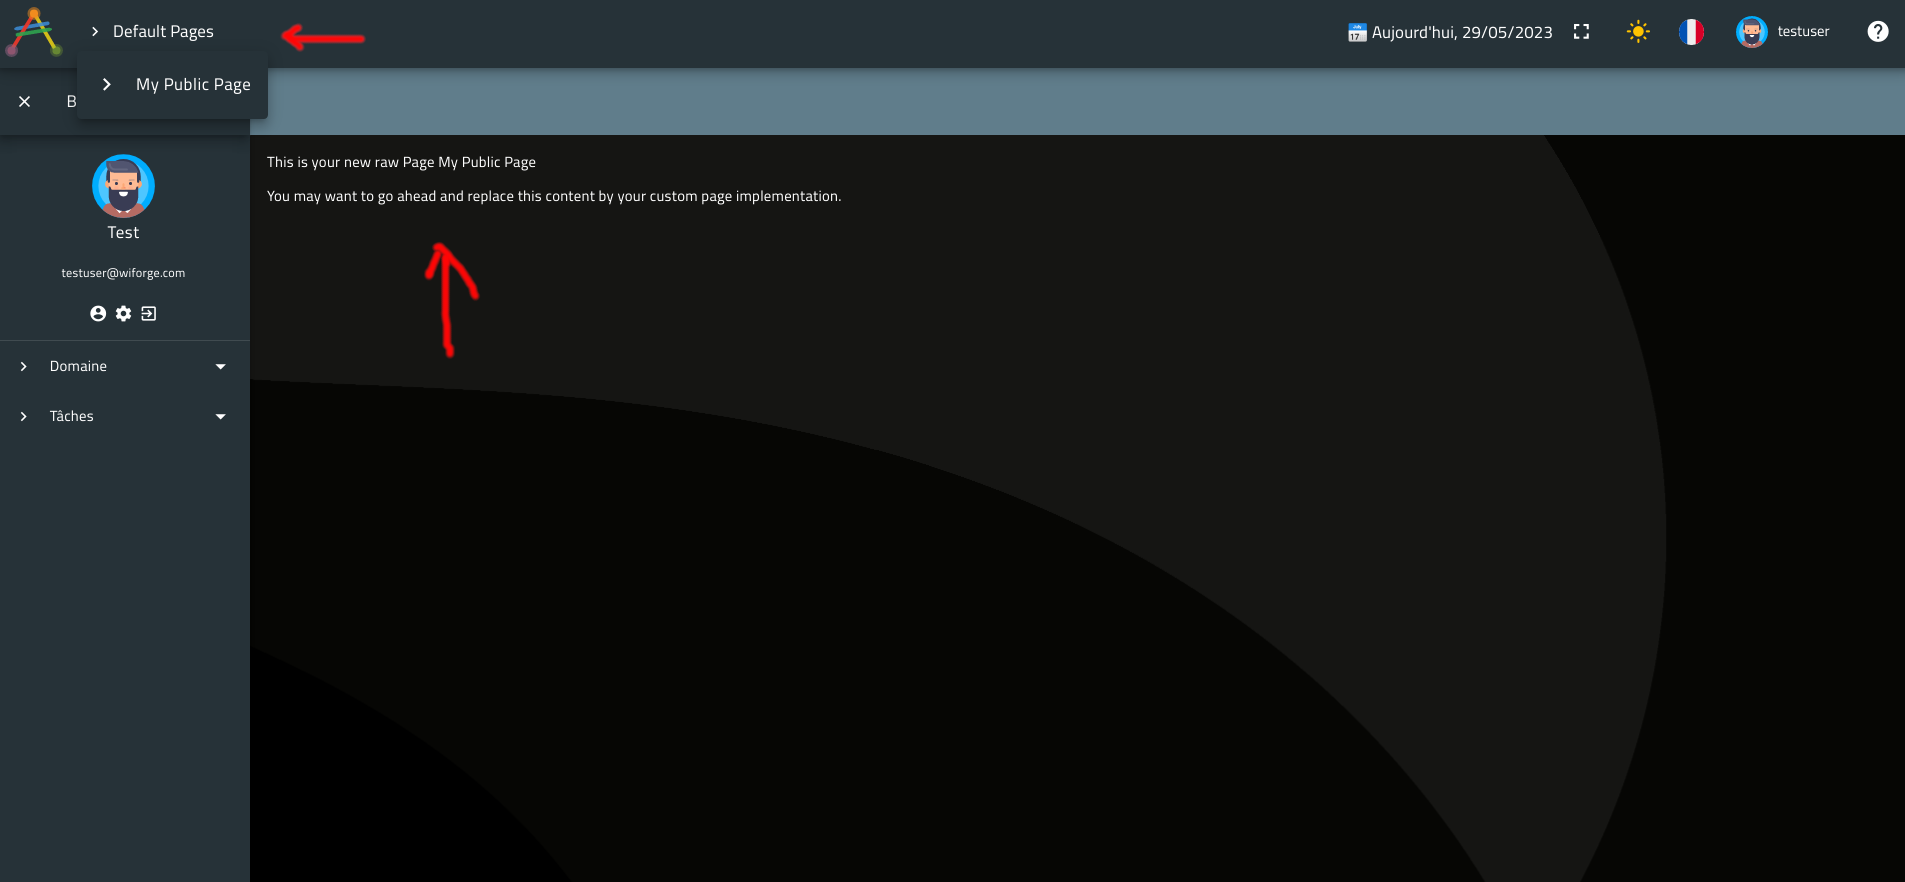
The workflow command has created an empty component, a link to this component page, in the top menu, named My Public Page and a grouping menu named Default Pages.
Note that all blank pages links are, by default, created under the grouping menu named Default Pages.
Averos Framework provides a way to change the menu layout by configuration, however this will not be covered in this tutorial and will be the subject of other advanced tutorials.
Now, go ahead and start customizing your new page at your will !
Next, we are going to explain how composite members which define entities’ relationships, are handled in averos framework.
Though you might skip the next part to the final chapter where your application will learn and speak new languages, we still highly recommand you take few moment and read this section so that you could grasp relevant core averos framework patterns.
III. About displaying composite members (relationships) in View, Edit and Create view layouts
There are a couple of thing to bear in mind when dealing with entity composite members in a context of Create, View or Edit entity. Those composite member are defined as either OneToOne or OneToMany relationship between a given Parent entity and another Child Entity.
For exemple, you saw earlier how ToDoArea is composed of a collection of ToDoTask. This is depicted by a OneToMany relationship where ToDoArea is the parent (or owner) and ToDoTask is the child.
You also saw how such relationship is displayed in Edit and View layouts as a tab panel that implements a Search Result View Layout (a table) which holds all childs (since the parent is linked to several child instances).
Similarely, a OneToOne, relationship is displayed in a tab panel that implements a View/Edit View Layout (since only one instance is displayed).
From APIs call perspective, edit entity and view entity use cases relies on call to getEntityById(id: string) in order to retrieve the parent instance.
This apis is generated by default by averos workflow command when the managing service related to the parent entity is generated.
🙋♂️ Please do not attempt to change or modify the signature of any generated function in averos managing services since this will break .
Those are core framework functions that are used under the hood.
On the contrary, you might modify the default logic within these function or add more functions to averos services at your convenience.
Again, only function signature matters, so you should keep them as is.
Thus, any modification on core framework function signature-depicted by the function name, input parameters and output parameters- will break the framework capabilities.
As a result, if you would like to display a OneToMany relationship (by showing the collection of child items in a seperate tab) then your api should return, aside from your parent entity, the collection of child items Ids to be displayed.
Those child items ids will be used accordingly by the child entity managing service api getEntitiesByIds(ids: string[]): Observable<any> in order to retrieve the related child actual instances collection.
ℹ️ Given a parent entity, if you are willing to display child items within a
create, aneditor aviewentity use case you need to adapt you backend api so that :
- In the Parent entity managing service,
getEntityById(id: string)should return aside from the parent entity instance, a collection of childids- Decide which strategy you will follow when updating/creating a
OneToManyrelationships: Update happens either in asingleor inmultipletranscations.
Asingletransaction implies one api call which will handle the child items.
multipletransactions, on the other side, implies multiple api calls for each child. You should mind these aspects when designing your API logic. Please refer to averos entity update strategy to learn more about update strategies that come with averos.
🔖 Note that relationship update strategy is customizable using the averos workflow command
add-composite-memberby setting the flag--member-update-strategyto eithersingleormultiple. The related logic implementation will be automatically generated for you by the workflow command.
🎉🎉🎉 Congratulations on making it this far! 🎉🎉🎉
Your ToDoApplication is now fully functional and ready to be taken to the next level!
How about your application learns new languages?
Sounds great ?
Ok then, let’s move on to the final chapter!
See you soon!