Initialize Your Application - ToDoApplication
Since Averos Framework is powered by angular, any averos project is actually an angular project.
Therefore, an angular project should be created in order to initialize your project.
I- Create a new angular application
As mentioned in the prerequisites section, creating a new angular application will require to install
@angular/cli, so let us go ahead and install it, if not already done, using the following command :npm i -g @angular/cli
🙋♂️ Please refer to angular version compatibility section, for further angular versions compatibility information support.
Once the cli is installed, we can use the angular ng new schematics to initiate a new angular application.
Go ahead and execute the following command in order to initialize a new angular project named ToDoApplication
ng new ToDoApplication --style=scss --routing --strict
🔖 Note: Since
averosdoes not support other styling types, you should specifyscssstyling type when creating a new angular application. Other styling types will not be supported in future releases.
II. Initialize an averos application
After creating a new angular project, you will want to add averos features and capabilities to your project.
This will trigger an averos process that will guide you through a set of customizations including application name, default language, additional language and authentication provider.
The process execution will result in an initialization of your angular project with averos framework.
Change your current directory to ToDoApplication project directory by executing the following command:
cd ToDoApplication
While inside ToDoApplication project directory, go ahead and execute the following command in order to trigger averos framework integration process workflow and convert your angular project into an averos project.
ng add @wiforge/averos
🔖 Note: Averos could also be installed via
npm installbut we recommand to use theng addschematics in order to trigger the integration wizard that will integrate all averos key features for you.
The averos integration wizard, triggered via ng add @wiforge/averos, will take you through the following customizations details:
- Specify your application name
- Choose whether
authenticationis enabled or not (enabled by default) - the authentication provider (In case
authenticationis enabled). If you are willing to implement your own authentication provider then please refer to authentication provider reference section. - Specify your default application language (default is english)
- Specify an additional application language (if you wish to setup an additional language support)
🔖 Note: You might want to run the
averos frameworkintegration process workflow automatically without beeing prompted to several customization steps by simply executing the same commandng add @wiforge/averosand mentioning its customization parameters. If you wish to bypass command prompts then go ahead and use the following command instead of the previous one:ng add @wiforge/averos --application-name=cd ToDoApplication --enable-authentication --authentication-provider=custom --default-language-code=en --defaults --skip-confirmation
After running ng add @wiforge/averos which results in integrating averos framework into your angular project, the latter will now be updated with all averos features.
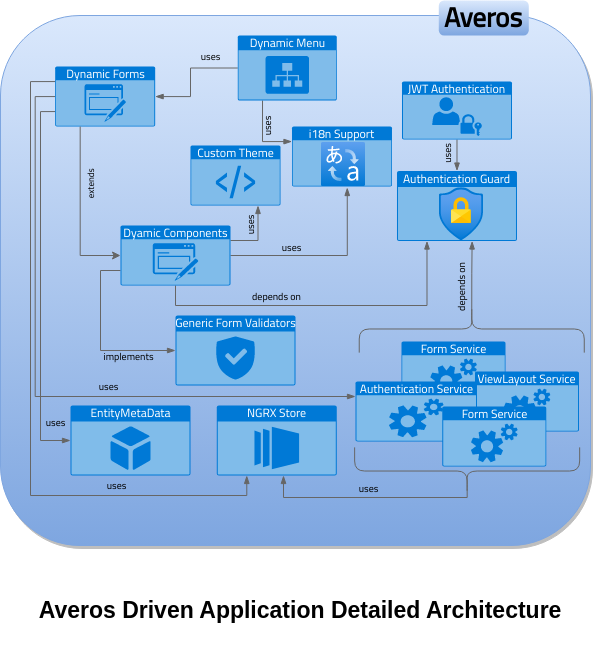
As a result your application architecture is now driven by averos framework architecture providing a set of features and capabilities described in the picture below.
Next, you might want to test your averos application and see how does it look and what features are already available. The easiest way to do that is to run your application using the following command:
`ng serve ToDoApplication`
The other way of deploying your application is to use a web server such as nginx.
In this tutorial, we will use the second method and deploy our application to the lightweight http-server; but you are free to choose whatever method and web server you like to procede with.
🚀 CONGRATULATIONS! YOU ARE READY TO GO! 🚀
III- Run your application
Congratulations! You have so far created an averos application named ToDoApplication.
Your new web application is already responsive, progressive with pre-defined handy layout, jwt authentication support and multi-language capability.
Go ahead and run your application so that you can have a glimpse of the overall layout and basic features.
💡 ProTip: Running your application could either be by executing the following command
ng serve ToDoApplicationor by deploying it to an external application server such asnginxorhttp-serverfor testing purposes.
1. Deploy your application to http-server
The easiest way to deploy your application to an external server is to use the lightweight http-server. Of course there are plenty of ways and servers out there to use but we are going to keep it simple for the sake of this tutorial.
Please go ahead and execute the following command in order to deploy your application to the lightweight http-server.
npm install http-server && npm install && ng build ToDoApplication && http-server -p 8080 -c-1 dist/to-do-application
Note: The previous command does a couple of things besides deploying your applications:
- installs
http-server- builds
ToDoApplication(by default build output is placed underdist/to-do-application)- deploy
ToDoApplicationtohttp-server
2. Log into your application
As mentioned earlier, your new web application ToDoApplication has jwt authentication support which activates private logged spaces for you, meaning that your application already supports mutlti-users.
Currently it is not possible to exclude such capability since its is forced by default in every averos project.
However, future averos version may include the possibility to bypass authentication.
Thus, every averos application will need an authentication provider in order to allow users to log into their defaut private spaces where entities and use cases are handled.
2.1. Check your authentication provider server
For the sake of this example we are going to use the authentication mock server available here.
This mock api provides Jwt Authentication and User management services.
ℹ️ Please make sure you already followed the prerequisites section instruction.
The authentication backend mock servershould be up and running.
2.2. Authentication Service Binding - User Service Binding
As you might already know, your application authentication service needs to be bound to one authentication backend service so that it could be activated.
Similarely, your application user service - the service in charge of user management - needs to be bound to one User Management Api Server Backend.
Again Authentication and User Management will be provided by our authentication backend mock server mentioned earlier.
As a result, two averos service configurations should be created using the reserved identifiers AuthService and UserService.
Please go ahead and execute the following command in order to create an Authentication Service Binding Configuration.
ng g @wiforge/averos:averos-config --id=AuthService --type=service --host=localhost --port=3333 --protocol=http --endpoint=/auth/ --defaults
You should see similar output if the command executed successfully:

Similarely, go ahead and execute the following command in order to create a User Management Service Binding Configuration.
ng g @wiforge/averos:averos-config --id=UserService --type=service --host=localhost --port=3333 --protocol=http --endpoint=/uapi/users/ --defaults
Note that we are assuming that your
authentication backend servicemock is running in localhost (--host=localhost), on port 3333 (--port=3333) through http protocol (--protocol=http).
If you have changed these parameters please update the previous command accordingly.
Also, make sure not to change the other parameters (i.e.id=AuthService,type=serviceandendpoint=/auth/) since those has specific fixed values foraveros application authentication service.
ℹ️ More detail on averos configuration could be found here.
Once your configurations are created, go ahead an redeploy your application by following these steps:
1- shutdown the running server
http-server
2- build and deployToDoApplicationby running the following command:
ng build ToDoApplication && http-server -p 8081 -c-1 dist/to-do-application
2.3. Log Into your Application
Now your application is deployed and configured you will be able to sign into your account.
Open your favorite web browser and navigate to http://127.0.0.1:8081.
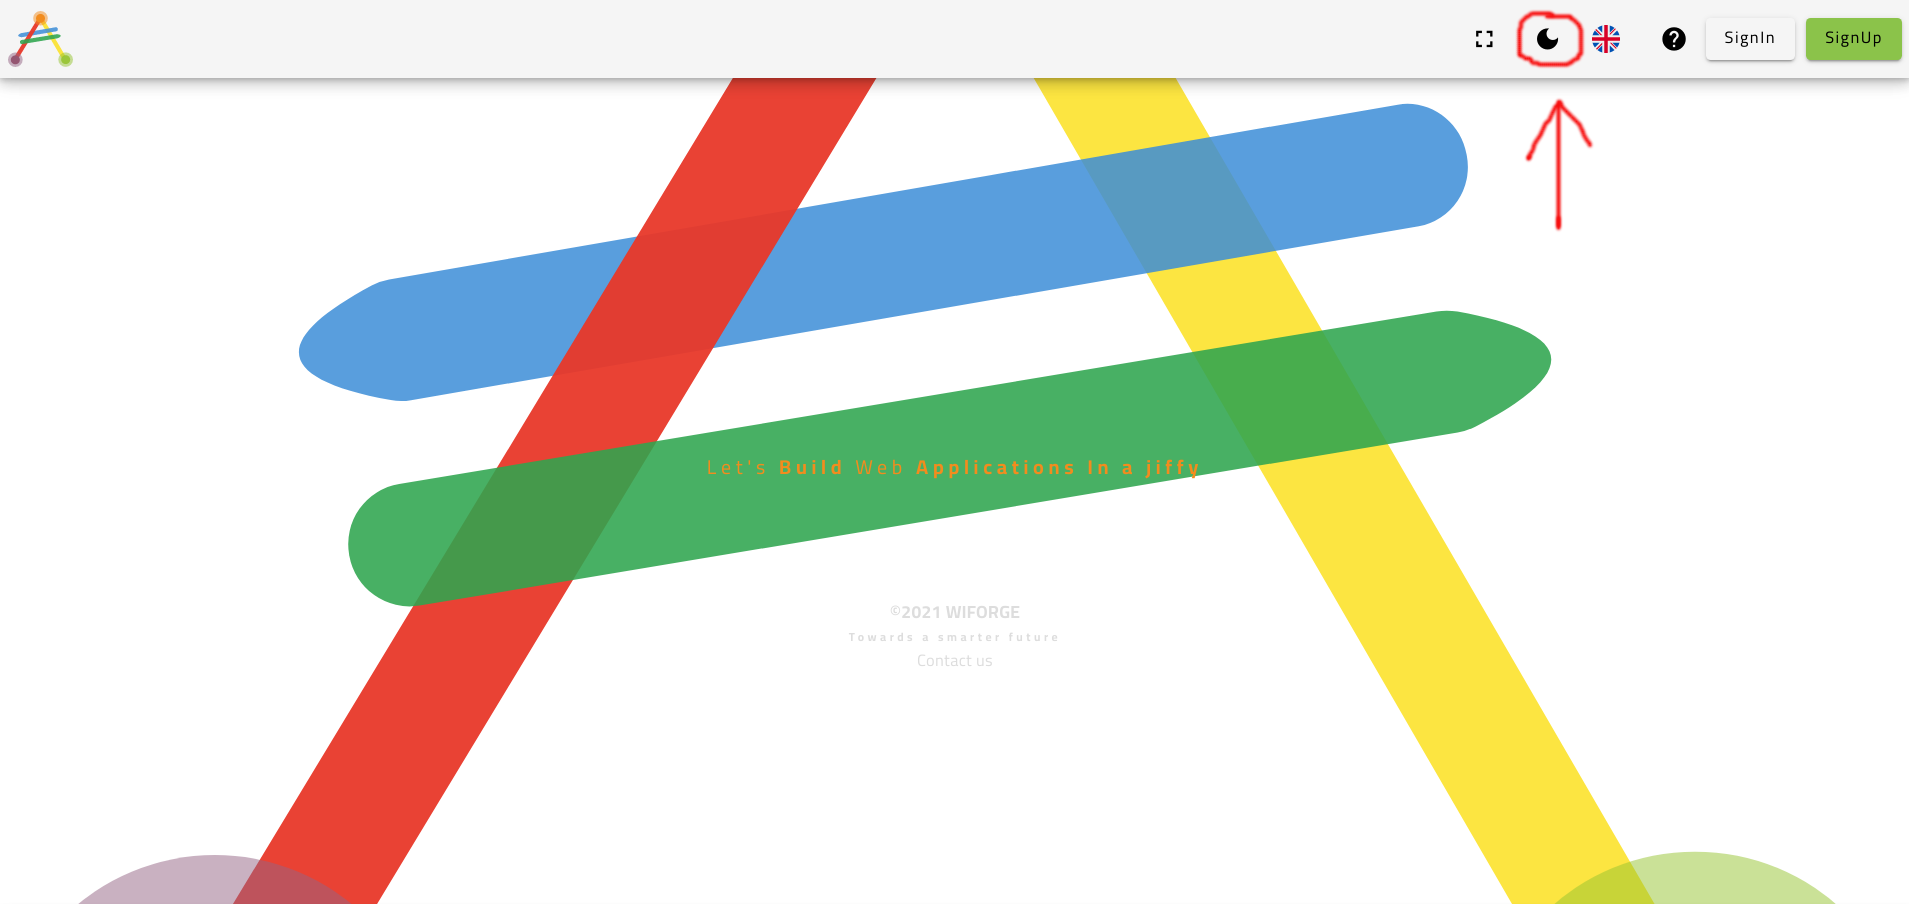
Here is what your application will look like. The public space is what a user will see first.
Once logged in, the layout will be switched to the private space context. More on that later.
Averos application template provides an additional dark mode available via the button highlighted in the picture below.:

ℹ️ Since we have not added any languages yet, our application is available only in
Englishwhich is the default language.
You will be able to add another language to your application very soon, but before that, let’s create a new account and sign into our application.
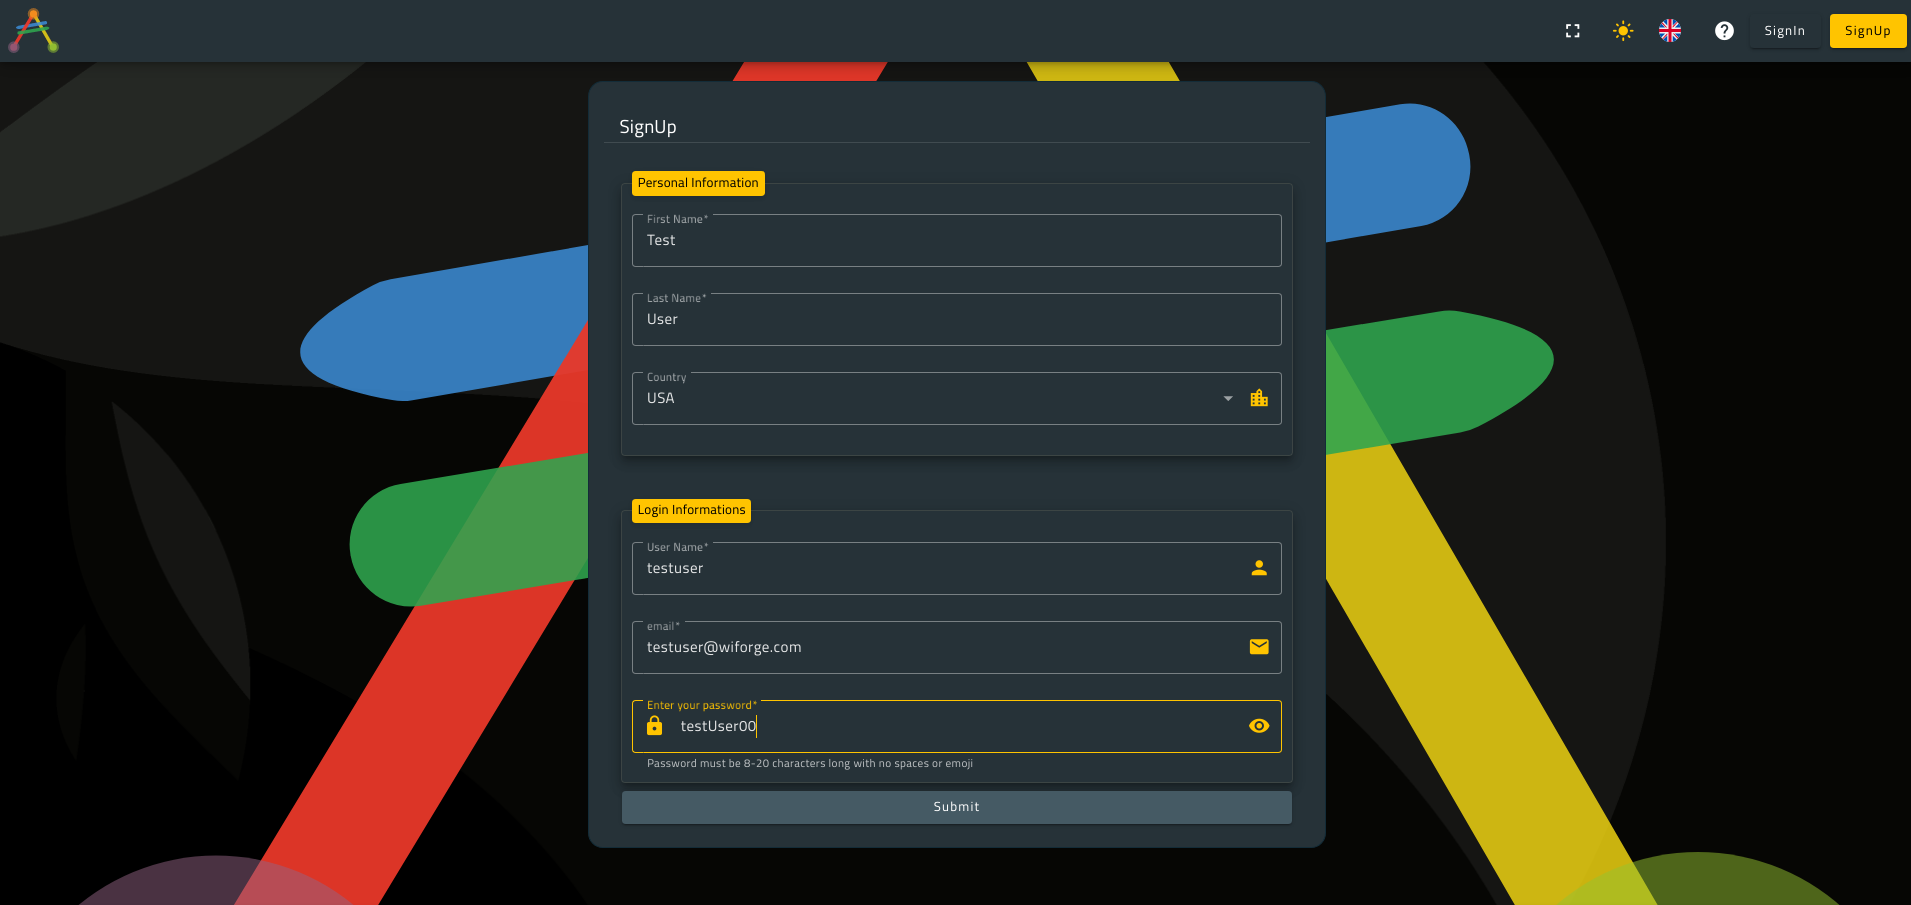
Go ahead and hit Sign up button in order to create a new account.
Here is what the registration screen looks like. I prefer dark mode that’s why all my screenshots will be made in that mode but you are free to choose whatever mode you like.
Now our user is registered, we can use our credentials to log into our private space.
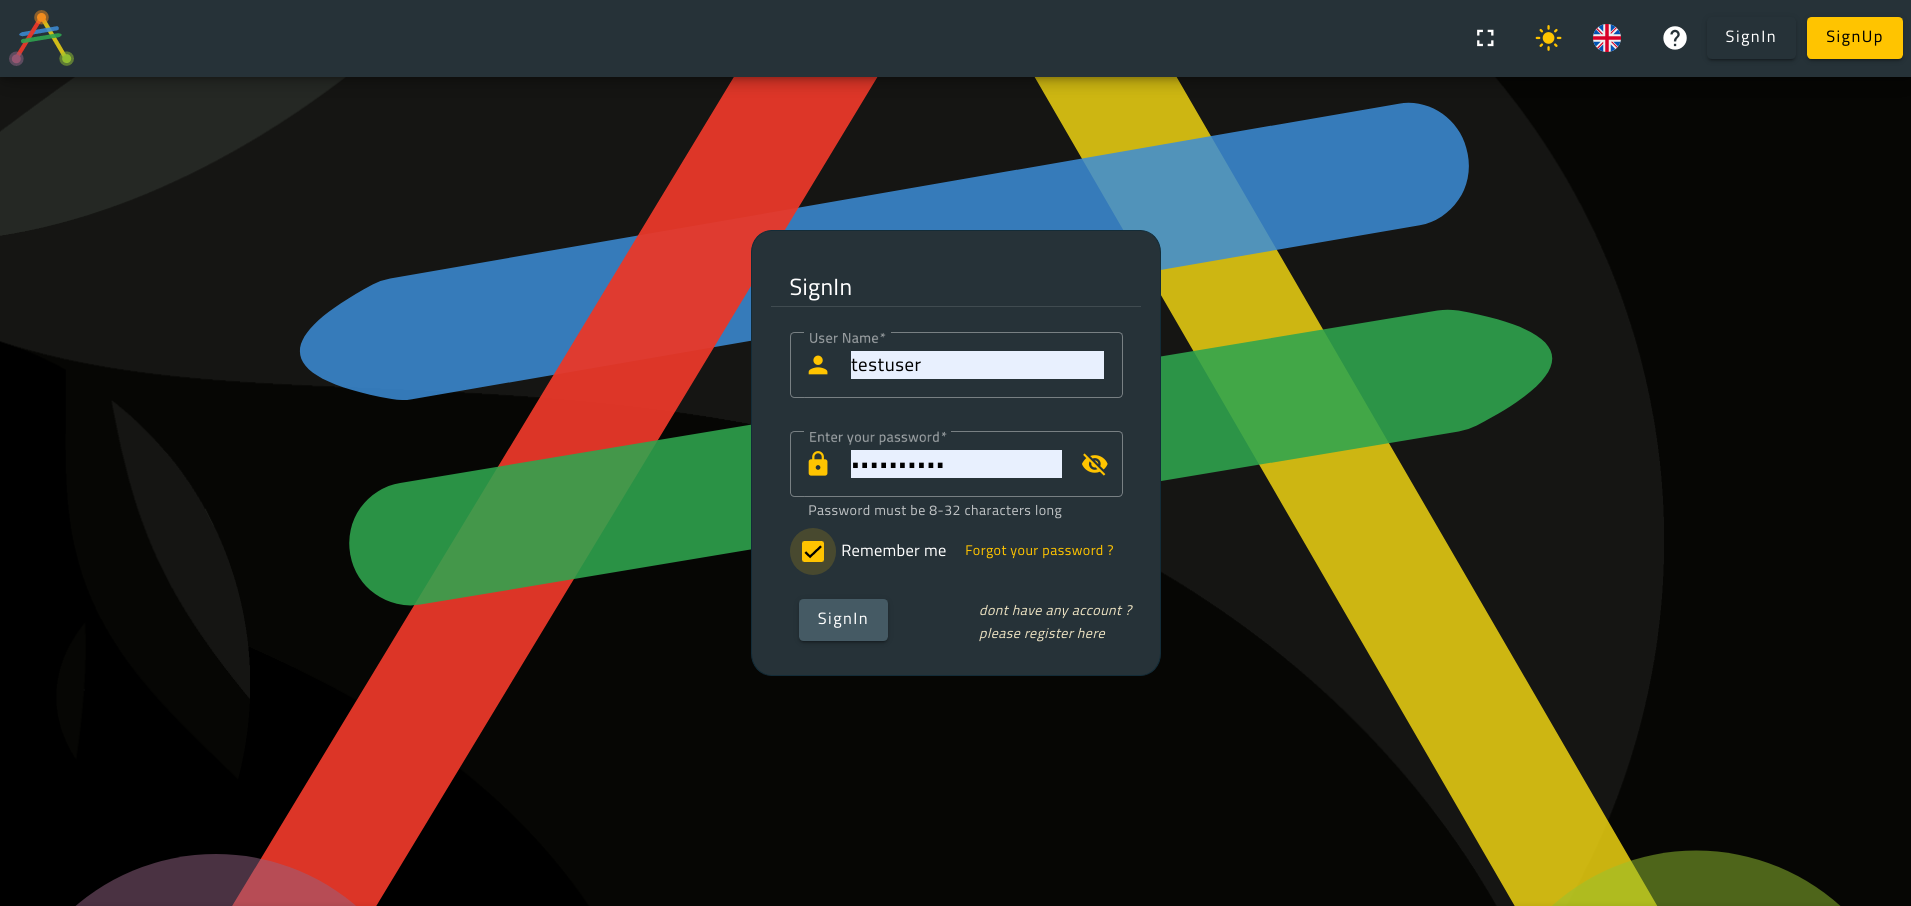
Go ahead and sign into your application by hitting the sign in button then entering your credentials as shown below. I am using a user identifier named testuser along with the password testUser00, but you can choose whatever user/password you wish.
Please keep in mind that averos passwords are subject to validations. Therefore, you should choose a password that is compliant with averos validation rules.
Don’t worry, your application itself, will guide you in creating a compliant password thanks to the validation error messages you will encounter.
This is what averos private space looks like:
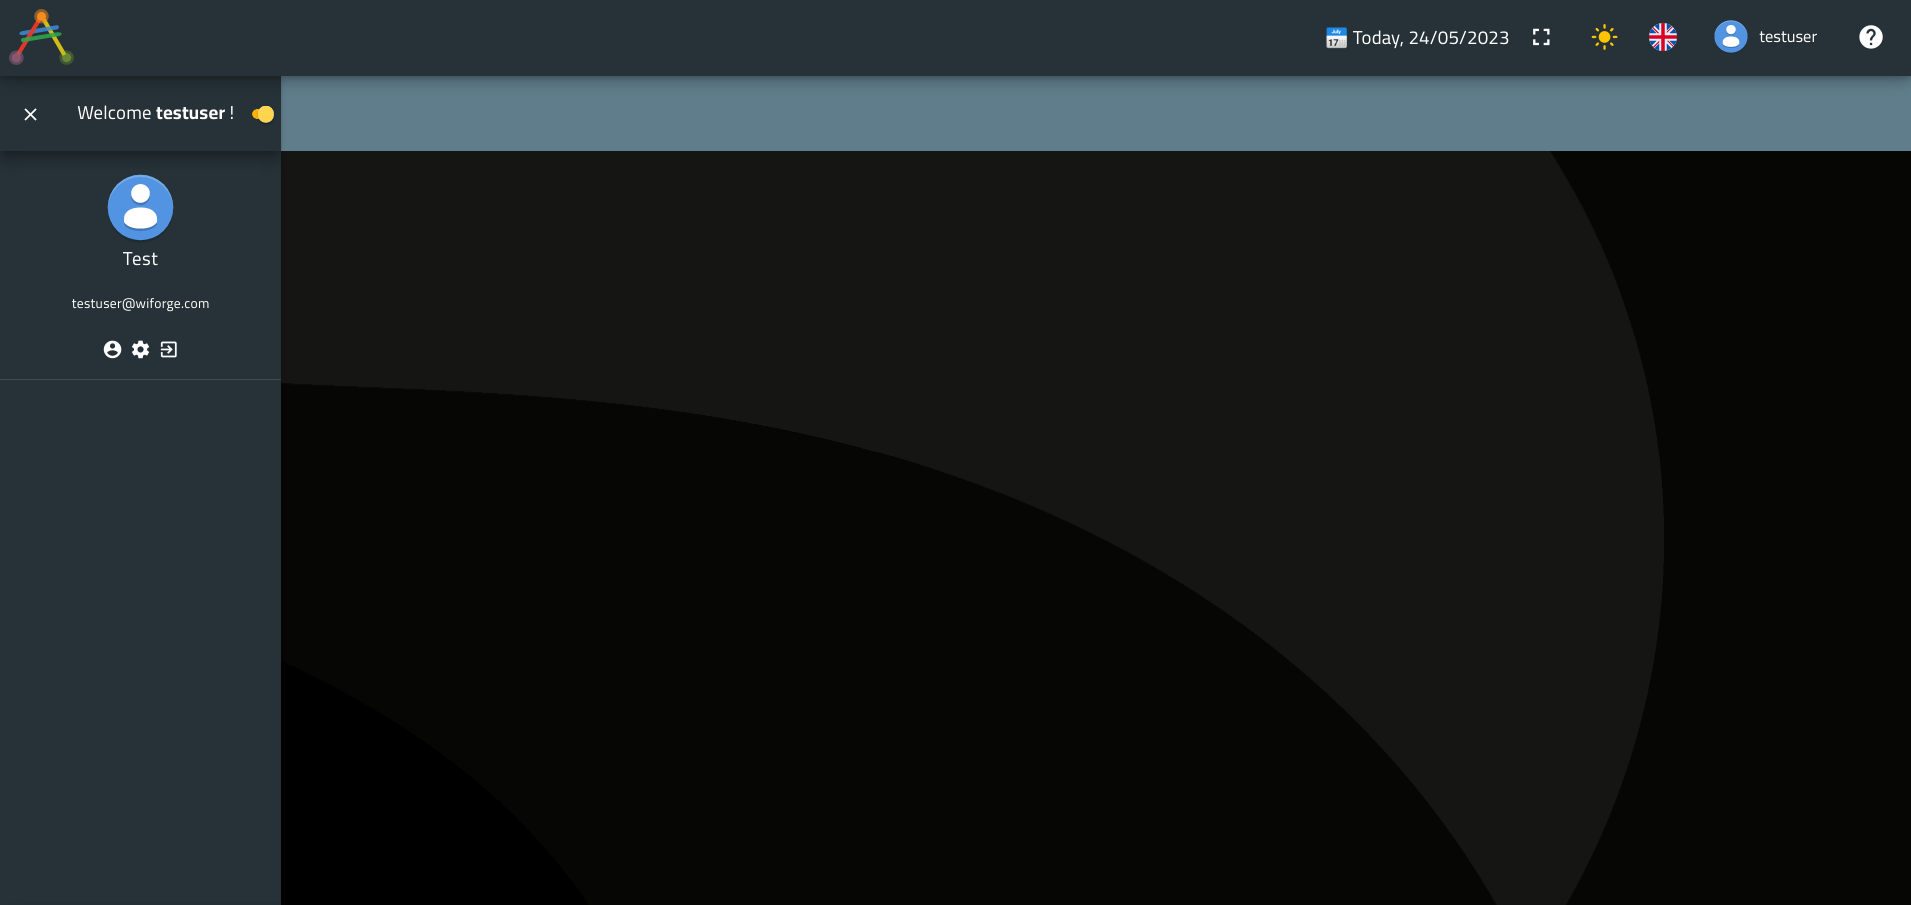
Now you are logged into your basic averos application, you might want to have a look at all available features. Go ahead and change your
avatarfor example. Also, you canedityour profile and check yoursettings.
🚩 Averos based applications have by default two domain spaces :
- public space : available for public anonymous users
- private space : only available for authenticated users
2.3.1. Averos private space
Averos private space is the space that is accessible only for authenticated users.
It is composed of a top menu, a left side bar dedicated for the user profile and the menu and a content area.
Earlier, when you logged into your application, you noticed that there were no menu configured yet (the menu is located in the left side bar).
Actually, averos menu is generated based on the use cases that have been initiated by the user.
This means that, since we have not created any custom entities or use cases yet; there will be no menu available in your application at this point.
Once we will start adding entities and business logics to our application, the default menu will be created and updated accordingly.
2.3.2 Averos public space
Averos public space is available in order to allow unauthenticated users to access any public information that is meant to be shared in the application.
The application owner decides wether to restrict access to a specific component, page or use case or to fully disclose it.
If you chooses to make a use case anonymously accessible, averos gives you the ability to add a default menu link in that public space using the dedicated averos workflow command create-page.
The public menu link will be available in the application home page top menu as part of the default generated menu.
🚩 Averos menu could be easely configured in many ways. Different configurations aspect are available to the end user in order to allow the finest customizations. The configuration includes:
- adding, removing, updating or grouping menu items;
- icon to display on the menu item/group,
- the target link or route
- the ability to configure external links like websites or external applications URLs.
- the ability to disable a menu/submenu/menuItem
- let the menu available in public spaces
📢 More on this topic is available in the detailed averos documentation.
While navigating through the application, you will mainly notice the following points:
- all of your chosen languages are supported and you can actually switch between them flawlessly (more on this topic later).
- All the application components are translated to the requested languages (buttons, input placeholders, tooltips, labels, error messages, form validation messages, notification messages… )
- login/logout menu are pre-built but could be also customized by bringing your own components
- pwa support is obvious since we are still in the angular echosystem
- your application is fully responsive (check it by turning on the mobile preview in your browser devtools)
- dark mode is supported ( dark mode is supported, alternatively, averos styles could be easely overridden so that you can fully customize your application layout, but we recommand keeping the default layout for better stability)
- APIs backends are easely bound to your application services using
averos configurations
🎉🎉🎉 Congratulations! on making it this far! 🎉🎉🎉
Further in this guide we are going to learn how to customize our application in order to meet our business requirements by adding use cases, actions, translation capabilities, view layouts and much more.
See you in the next chapter!