Customize your application - Generate Business Entities
I. Introduction
We have so far defined the application business requirement as well as the target application design then generated a first version of our ToDoApplication with authentication and user management capabilities.
Now it is high time we implement all of those business requirements we defined earlier and create our application within minutes!
In this chapter we are going to use averos framework to create our business entities along with their relashionship; those entities that we defined earlier in the design phase.
II- Generate Business Entities
Let’s step back for a moment and recall the business entities we designed earlier.
The following class diagram shows two business entities with a set of members or fields of different types.
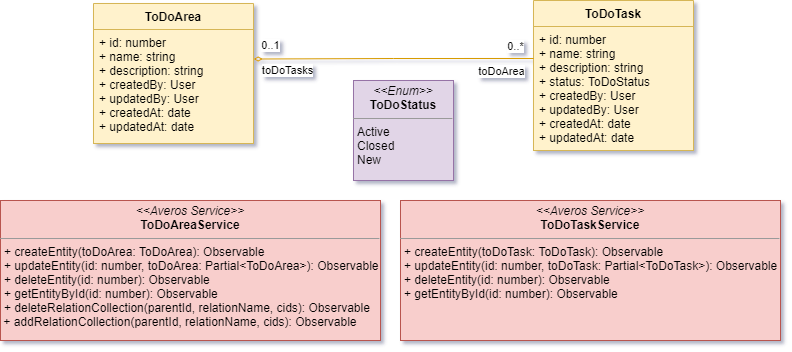
Our design is composed of Two entities, namely ToDoArea and ToDoTask, managed by two services, respectively ToDoAreaService and ToDoTaskSerice.
ToDoArea and ToDoTask are related to each other since a ToDoTask can belong to a ToDoArea.
ℹ️ As mentioned in the previous chapter an averos service should be bound to its api backend using an averos configuration.
Since each business entity is managed by an averos service, those services should be bound each to one single dedicated service configuration.
Therefore you might want to create two service configuration forToDoAreaServiceandToDoTaskSericeafter generating the business entities.
In order to generate the previous class diagram you need to follow the steps below:
- generate each entity and link it to its managing service
- generate entity members for each entity
- generate entity relationships
- generate a service configuration for each managing service
Let’s generate our two business entities along with their managing service.
ℹ️ Averos commands could be executed either in interactive mode or in silent mode.
For the sake of this tutorial, we are going to execute all commands in silent mode.
Nevertheless, it is fine to execute these commands interactively if you wish.
ℹ️ Please make sure you execute averos workflow commands UNDER YOUR PROJECT HOME FOLDER!
Averos Framework provides the averos workflow command,averos-entity, which will generate the target entity along with it’s managing service for you.
1. Generate ToDoArea and ToDoTask entities
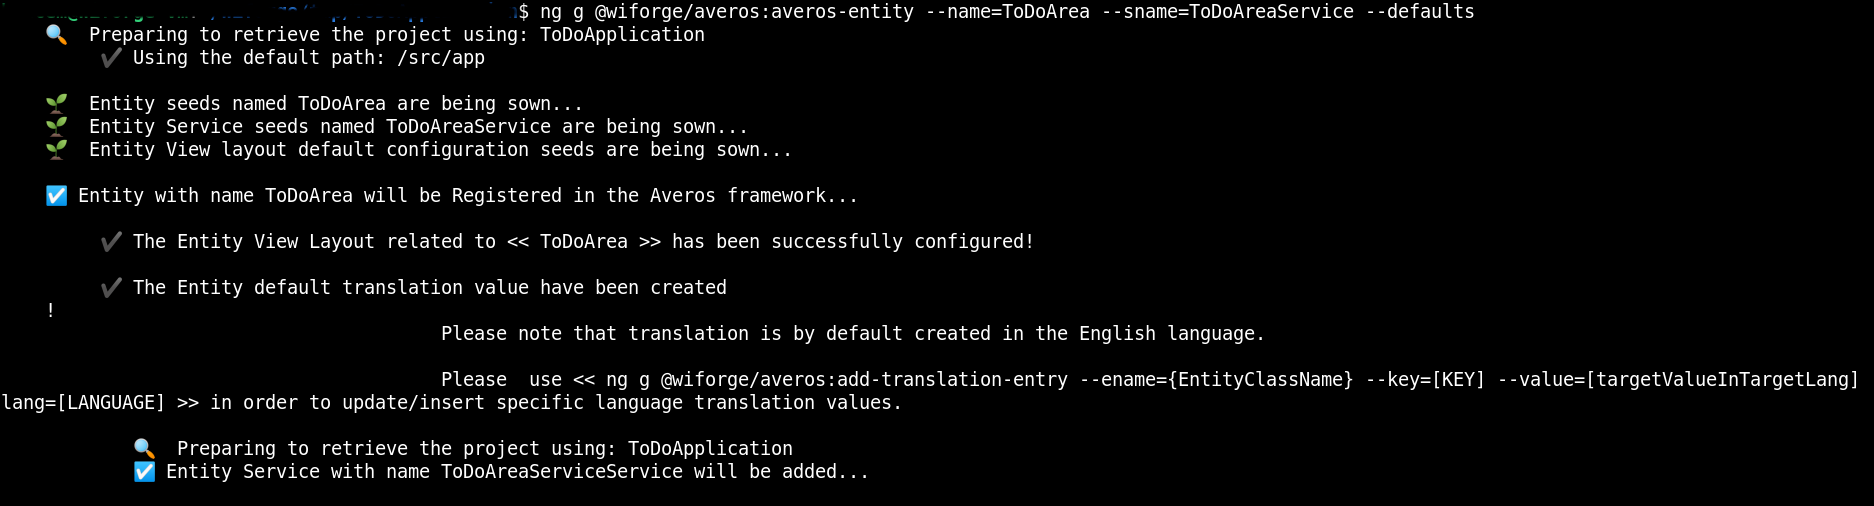
Go ahead and execute the following commands in order to generate ToDoArea entity:
ng g @wiforge/averos:averos-entity --name=ToDoArea --sname=ToDoAreaService --defaults
The output of the command will look like the following:
Similarely, go ahead and execute the following command in order to generate ToDoTask entity.
ng g @wiforge/averos:averos-entity --name=ToDoTask --sname=ToDoTaskService --defaults
ℹ️ Note that the managing service name is defined by the command parameter
--sname.
The execution of these two averos workflow commands will result in the creation of:
- an entity called
ToDoAreaand a service calledToDoAreaService - an entity called
ToDoAreaand a service calledToDoAreaService
🔖 Note that
averos framework, when callingaveros-entity, will create by default the following entity members:
- id: annotated by the averos @ID() decorator in order to tell the framework that it should handle this field as an identifier
- name: a string member describing the name of the entity
- description: a string member related to the entity description
- createdBy: of type User (averos User type by default) related to the user who created the entity
- updatedBy: of type User (averos User type by default) related to the user who updated the entity
- createdAt: of type
daterelated to the entity creation date- updatedAt: of type
daterelated to the entity update date
At this point you might want to open your project using your favorite IDE so that you can carefully examine the generated code for your project.
🙋♂️ Please refer to the averos service section for further details about averos services.
💡 Further details about averos commands are available in the detailed averos workflow commands section.
2. Generate ToDoArea and ToDoTask Simple Members
According to our design, both entities have a bunch of attributes (members) that come in different types.
At first glance you might think that those members should be generated as well.
Well, that is partially right!
Remember we mentioned earlier that averos-entity workflow command creates seven reserved members for every new generated entity.
Those members are, on one hand, reserved, on the other hand, automatically generated for you. So there is no need to regenerate them once again.
This means that, according to our design only one member should be generated.
This member belongs to the entity ToDoTask and it is called status.
averos-framework provides the workflow command, add-simple-member, in order to create entity members.
When executing this command you should specify the entity to which belongs the member (aka ename), the member name (aka mname) and the member type (aka member-type).
When the member to be added is of type enumeration, in addition to the previous command parameter, you might include the enumeration values (aka list-of-enum-values).
🚩 When executed interactively, the workflow will ask you to specify the enumeration values used for this type of member. Those values should be no-space comma separated valid javascript identifier (
value1,value2,value3).
Entries likevalue1 ,value2, value3orvalue1 , value2 , value3orvalue1 , value2 , value3orvalue1 , value2 , value3are not allowed.
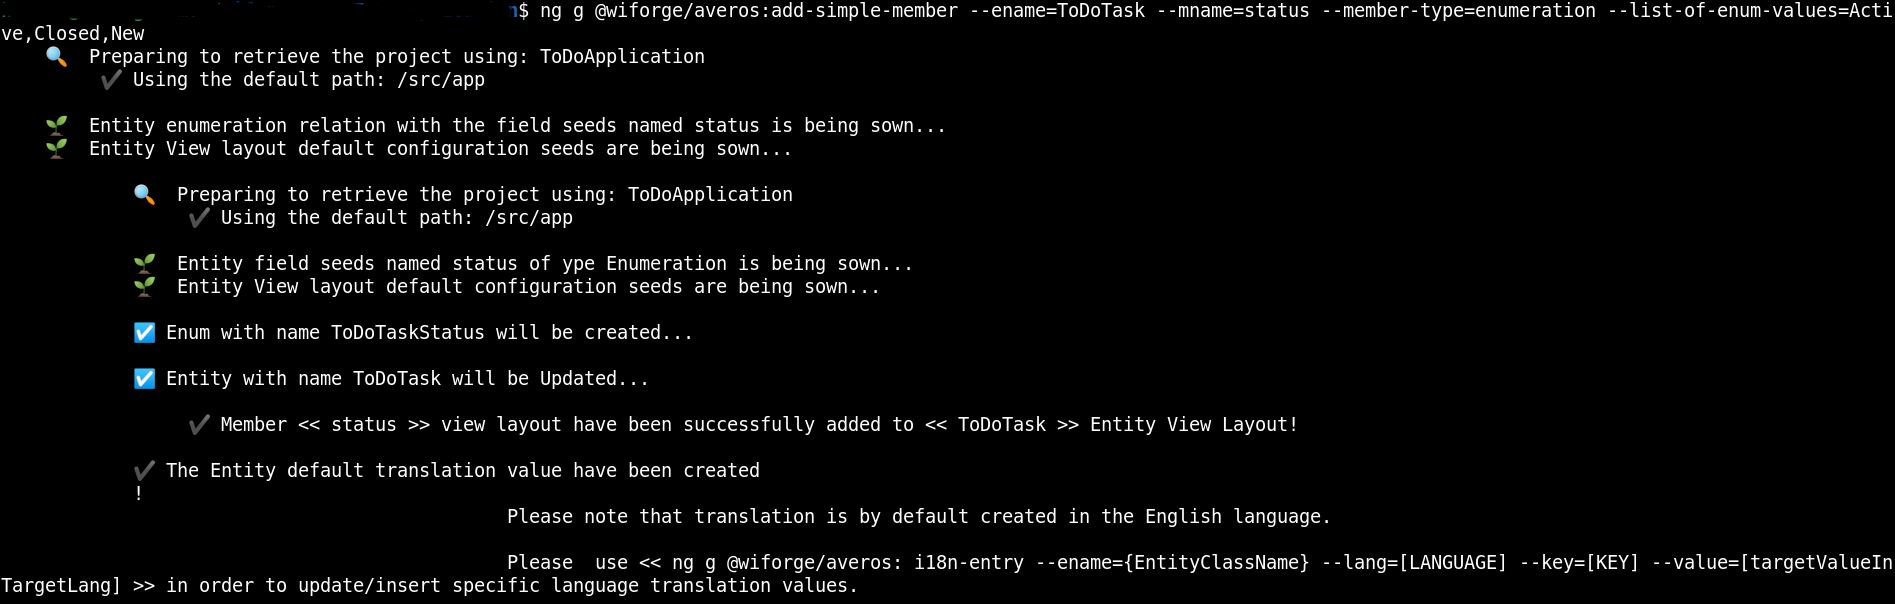
Go ahead and execute the following command to generate the member named status.
status is an enumeration that has three values: Active, Closed or New.
ng g @wiforge/averos:add-simple-member --ename=ToDoTask --mname=status --member-type=enumeration --list-of-enum-values=Active,Closed,New
The command output should be similar to the output below:
3. Generate ToDoArea and ToDoTask Relatioships - Composite Member
According to our design, ToDoArea and ToDoTask are logically related; given that one of our business requirement says that user can assign one or several ToDoTask to one specific ToDoArea.
Therefore, ToDoArea could contain one or more ToDoTask.
From a navigability perspective, a composite relationship can be either navigable or mute. When a composite relationship is navigable the relationship owner (parent) has knowledge of its composite child(s).
Averos framework defines relationship navigability within the owner entity view layout which will impact some of the use cases layout.
📢 More on this topic is available in the averos detailed documentation.
In our example, ToDoArea has knowledge of its ToDoTask child collection in the context of a One To Many relationship.
On the other hand, each ToDoTask child has knowledge of its ToDoArea parent entity.
Such a case could be seen as a two-way navigability.
In order to satisfy such requirement you omay want to:
- Reference a
ToDoTaskcollection by adding a new member of typeToDoTaskcollection to theToDoAreaparent entity - Reference the
ToDoAreaparent entity by adding a new member of typeToDoAreato theToDoTaskchild entity - Update both
ToDoAreaandToDoTaskview layout in order to display the navigability - Implement the
COMPOSITEservice APIs accordingly as described in the Averos Service APIs Naming Conventions section
Handling relationships will need further complex implementations and clear design. Not to mention that one should repeat the integration process for every member describing a relationship that should be handled.
Once again, averos fortunately introduced the add-composite-member workflow to achieve all the steps above.
🔖 Note that
add-composite-memberworkflow will update the project in order to automatically configure and display relationships in the user interface.
Refer to the detailed averos workflow commands section for further details.
Our one-way navigeable relationship is described as follows:
ToDoAreahas knowledge of itsToDoTasks. This is aOneToManyrelationship.ToDoTaskcollection is also updatable from its parent entity,ToDoArea. This means that the user can add or remove one or severalToDoTaskfrom theToDoTaskcollection related to a givenToDoAreainstance. Handling such requirement will result in defining a child’s update strategy using the flag--member-update-strategy.
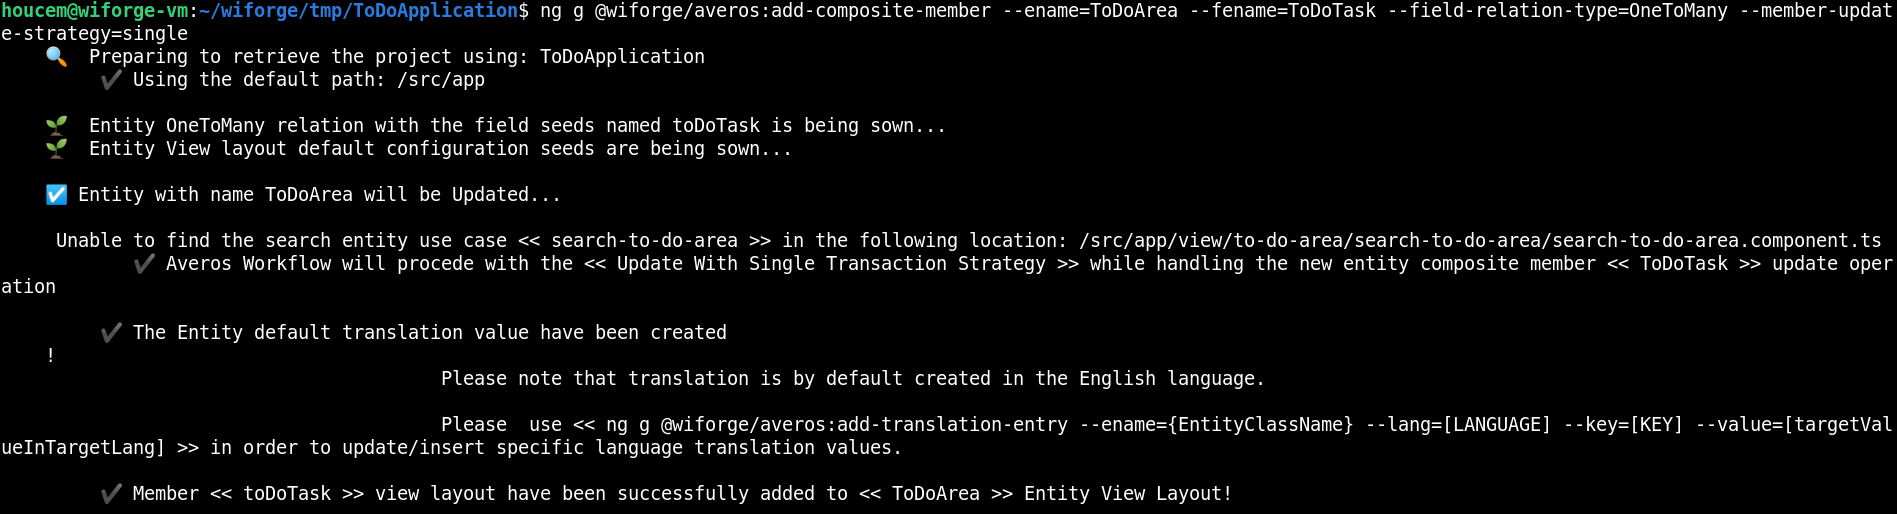
Now, let us go ahead and generate this relatioship (aka. composite member) by executing the ollowing workflow command:
ng g @wiforge/averos:add-composite-member --ename=ToDoArea --fename=ToDoTask --field-relation-type=OneToMany --member-update-strategy=single
The command output should be similar to the output below:
🔖 Note that after running these two commands and deploying your application, you will be able to view the newly added relations. Further user specific business implementation could be achieved in order to customize your entity management workflow. Some of these aspects were described in the next chapter.
4. Generate ToDoAreaService and ToDoTaskService Bindings Configurations
ToDoAreaService and ToDoTaskServiceare the managing services of ToDoArea and ToDoTask.
These averos services need to be bound to their APIs backend service using averos configurations.
For the sake of this tutorial we are going to use our backend mock server in order to manage ToDoArea and ToDoTask entities, but you are free to implement and use your own APIs.
Recall that our
APIs backend servermock is running in localhost (--host=localhost), on port 3333 (--port=3333) through http protocol (--protocol=http).
If you have changed these parameters please use your new ones accordingly.
Go ahead and execute the following averos command in order to create ToDoAreaService service binding:
ng g @wiforge/averos:averos-config --id=ToDoAreaService --type=service --host=localhost --port=3333 --protocol=http --endpoint=/todoareas --defaults
The command output should be similar to the following one:

Similarely, go ahead and execute the following averos command in order to create ToDoTaskService service binding:
ng g @wiforge/averos:averos-config --id=ToDoTaskService --type=service --host=localhost --port=3333 --protocol=http --endpoint=/todotasks --defaults
Now our business entities has been generated along with their managing services, let’s look at our application again; but before that you might want to re-build then re-deploy your application so that all changes will be applied.
5. Re-Deploy your application and check it out
Go ahead an redeploy your application by following these steps:
1. shutdown the running server
http-server
2. build and deployToDoApplicationby running the following command:ng build ToDoApplication && http-server -p 8081 -c-1 dist/to-do-application
Once ToDoApplication is up and running, go ahead navigate to http://localhost:8081
Here is what your application looks like:
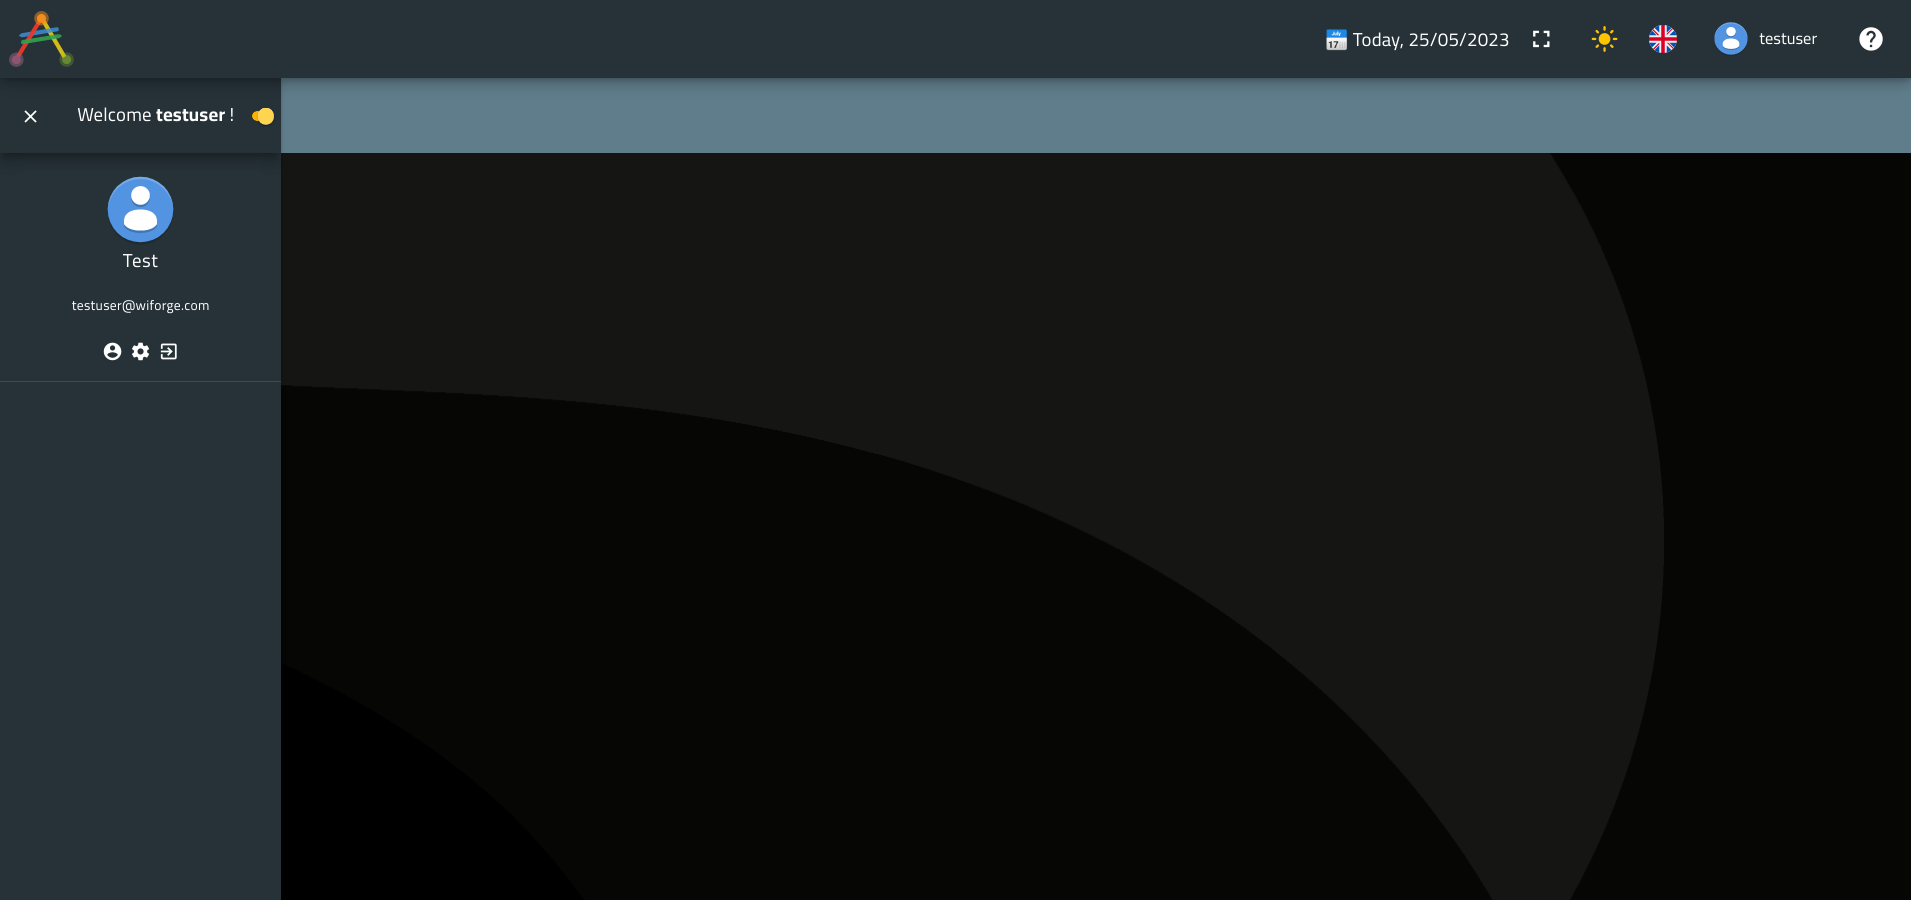
ℹ️ Did you noticed that nothing has changed in your application since the last time you visited it; even after implementing your business entities and your service ?
Well, that is because you have not added any use case yet.
Once you will generate your use cases, you will start to notice updates on the application menu.
Depending on the use case to be added, menu links will be added to the application as you generate more and more use cases.
Well that is what we will do in the next chapter!
🎉🎉🎉 Congratulations on making it this far! 🎉🎉🎉
You have generated your business entities along with their managing services in no time!
In the next chapter you are going to create the use cases you defined earlier in the design phase and start playing with your entities.
Let’s take your ToDoApplication to the next level!